
Creating a Cloud Event and Linking a Selfie Wi-Fi Template
This guide explains how to create a Cloud event and link a Selfie Wi-Fi template to it: two steps that must be completed before guests can start uploading photos.
Creating a Cloud Event
Log in to your Foto Master Cloud account, then go to the Events tab on the left and click + New Event in the top-right corner.
In the Event Info section, configure the following fields and click Save Changes when done.
General Tab
- Event Name: Enter the name of your upcoming event.
- Start Date: Specify the date the event begins.
- Duration: Total hours the event will run. The event remains usable even after the time has elapsed.
Creating a Selfie Wi-Fi Template
If you haven't created a template yet, see How to Create a Selfie Wi-Fi Template for a step-by-step guide.
Linking a Template to a Cloud Event
Software Tab
Open your event, go to the Software tab, enable Selfie Wi-Fi, and select your template from the dropdown.
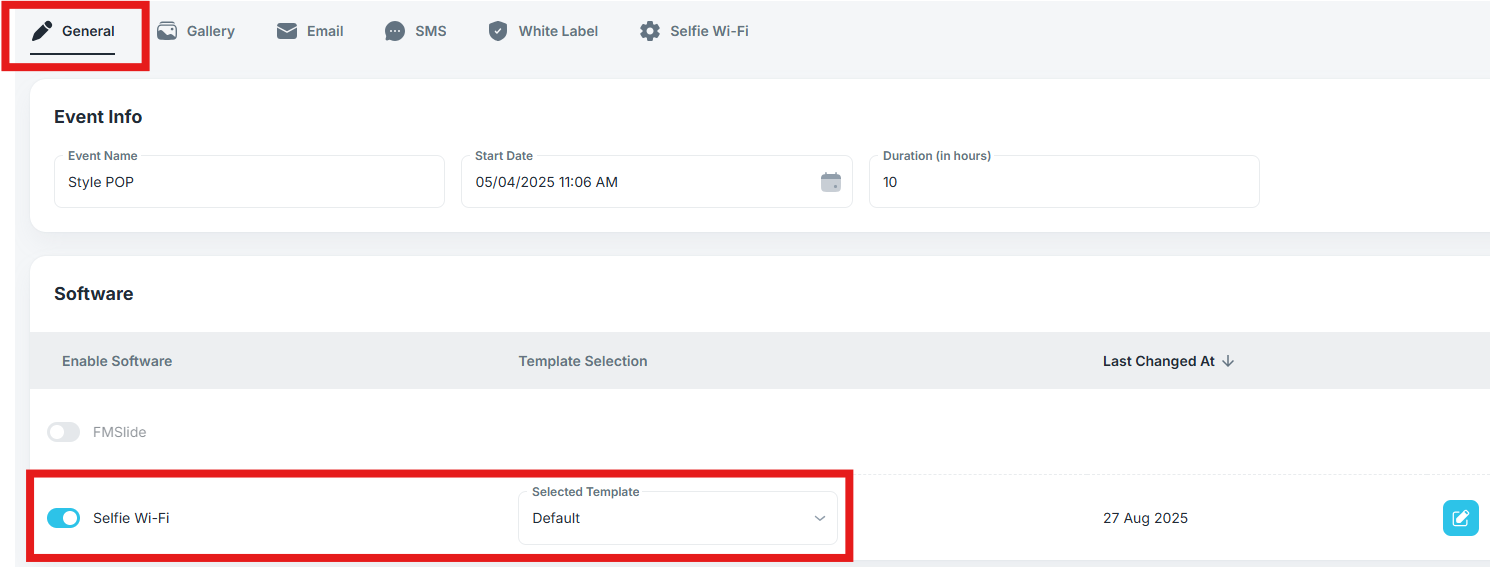
Once Selfie Wi-Fi is enabled, a Selfie Wi-Fi tab appears in the event. It contains:
- Landing Page Link: The URL guests use to upload photos. Share this link or the QR code in advance.
- Download QR Code: A scannable QR code that opens the landing page directly.
- Moderation: When moderation is enabled, each uploaded photo requires manual approval or rejection. Approved photos show a green outline; rejected photos show red. When moderation is off, you can still reject or reprint individual photos by clicking them.
Was this helpful?
Related articles
How to Use the AI StylePop Feature in Selfie Wifi
The AI StylePop feature lets you transform photos into fun, creative, and fully stylized scenes. Guests can enjoy a variety of pre-made looks or even create their own custom styles
How to Use the Selection Screen in Selfie Wifi
The Selection Screen in Selfie Wifi allows you to offer multiple AI options within a single activation. Guests can choose their own experience (whether through AI Line2Life, AI Sty
Selfie Wi-Fi Overview
Selfie Wi-Fi is Foto Master's self-service photo experience that lets guests use their own smartphones to capture, enhance, and share photos -- no dedicated booth hardware required
Selfie Wi-Fi: Getting Started
This guide walks you through setting up Selfie Wi-Fi for your first event, from Cloud configuration to having guests snap photos on their phones. Prerequisites Foto Master Cloud ac
Selfie Wi-Fi: Moderation Guide
Content moderation in Selfie Wi-Fi lets you review and approve guest photos before they appear in galleries, on slideshow displays, or in print. This is essential for public-facing