
Creating a PMWall Print Board File for Your Print House
Use the PMWall Print Board generator when your event needs a physical board with printed tile cells. The board PDF is created from the same grid settings used by the PMWall template, so the printed board and the PMWall output stay aligned.
This file is for the physical board layout. It is different from the final high-resolution mosaic image that PMWall exports after the event.
Before You Start
Confirm these details before creating the board file:
- The Cloud event has a PMWall template.
- The PMWall template has the final Columns and Rows values.
- You know the physical size of each tile, such as 2 x 2 inches.
- You know whether the print house needs cell labels, border lines, padding, or a specific board material.
- The client has approved the final board size and orientation.
Changing columns, rows, or tile size after the board is printed can break alignment between the physical board and the event output.
Open the Board Generator
- Log in to cloud.fotomaster.com.
- Open Templates.
- Select PMWall.
- Open the PMWall template for the event.
- Go to Main Image & Grid.
- Confirm Columns, Rows, and Cell Output Size.
- Open Print Board.
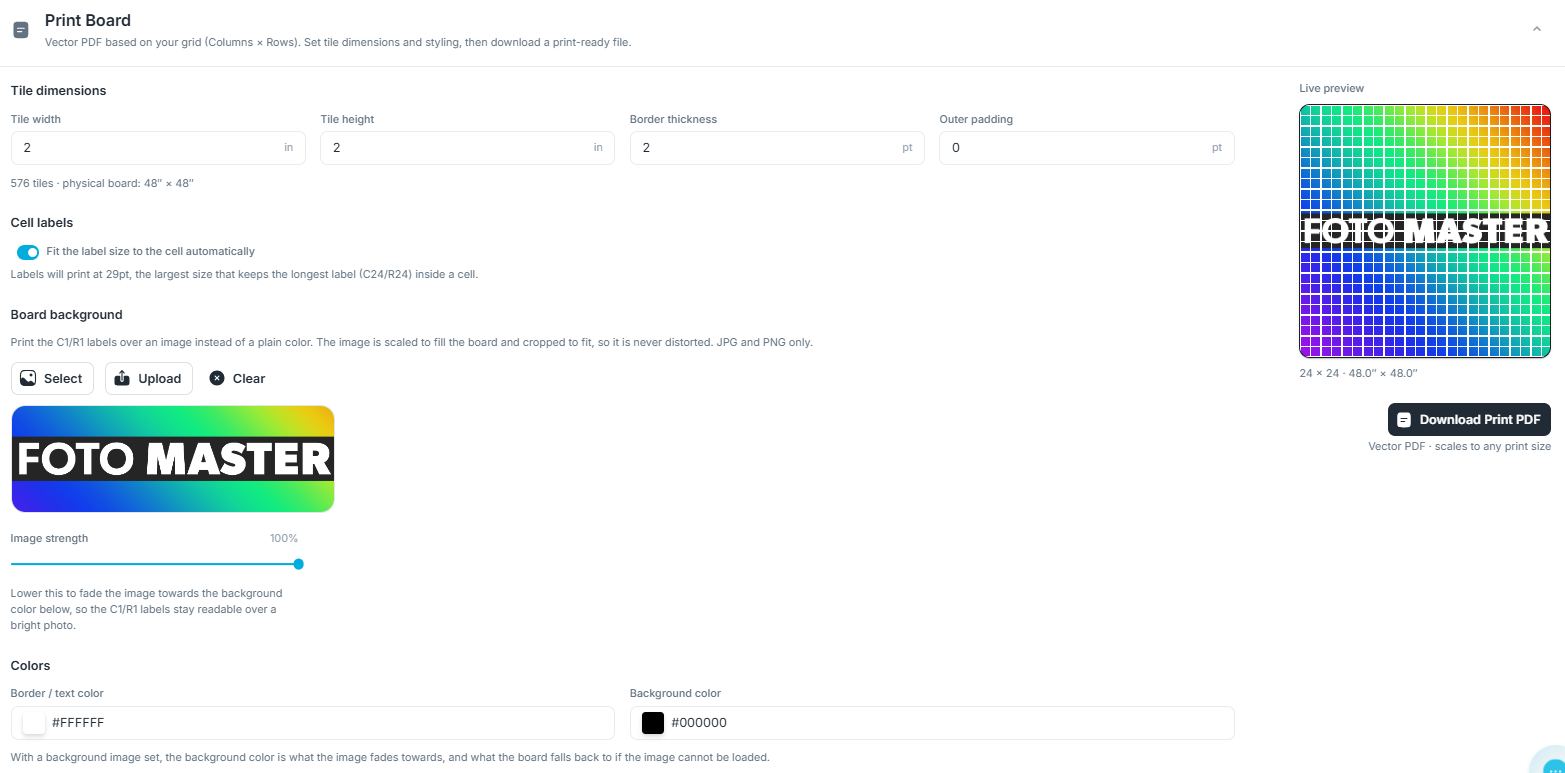
The Print Board section uses the current grid values from the same PMWall template.
Set the Board Dimensions
In Tile dimensions, set:
- Tile width -- Physical width of each printed cell.
- Tile height -- Physical height of each printed cell.
- Border thickness -- Thickness of the printed grid lines.
- Outer padding -- Extra space around the outside of the board.
The physical grid size is calculated from:
columns x tile width
rows x tile height
For example, a 24 x 24 grid with 2 x 2 inch tiles creates a 48 x 48 inch grid before any outer padding.
If you use outer padding, include it when confirming the final trim size with your print house. Outer padding is measured in points, where 72 pt equals 1 inch.
Configure Labels and Colors
Every cell is labelled with its column and row, such as C1/R1. Those labels are always printed -- they are what lets an operator match each printed tile to its position during the board build.
In Cell labels, set:
- Font size -- Controls the size of the cell labels.
In Colors, set:
- Border / text color -- Used for grid lines and cell labels.
- Background color -- Used behind the grid.
Use high contrast between the background and the border/text color so labels remain readable after printing.
Check the Live Preview
Review the Live preview before downloading the file.
Confirm:
- The grid aspect ratio matches the intended board.
- The total number of tiles is correct.
- The physical width and height match the event plan.
- The label style is readable.
- The colors match the print house requirements.
For very dense grids, the preview may hide individual grid lines, but the downloaded PDF is still generated from the full grid.
Download the Print PDF
Click Download Print PDF.
The downloaded file is a vector PDF named similar to:
pmwall-board-24x24-1234567890.pdf
The numbers in the filename identify the grid size and download timestamp. You can rename the file before sending it to the print house, but keep the grid size in the name so it remains easy to verify.
Send the File to Your Print House
Send the PDF together with clear production instructions.
Include:
- Final board size.
- Grid size, such as 24 columns x 24 rows.
- Tile size, such as 2 x 2 inches.
- Board material, thickness, and finish.
- Whether the board should be printed as one piece or split into panels.
- Whether the file should be printed at 100 percent scale.
- Whether the print house should add bleed, crop marks, mounting margins, or panel split marks.
Tell the print house not to scale the grid to fit a different size unless you intentionally approve a new tile size. Scaling the file changes the physical cell size and can make printed tiles or placement labels misalign.
Review the Proof
Before approving production, check the print proof:
- Confirm the final trim size.
- Confirm one tile cell measures the expected width and height.
- Confirm the first cell is labeled C1/R1.
- Confirm labels are readable at the final print size.
- Confirm panel splits do not cut through important labels or placement marks.
If any dimension is wrong, regenerate the board PDF from the PMWall template instead of asking the print house to stretch or compress the file.
Read Next
- Configuring PMWall Templates in Cloud
- Configuring PMWall Virtual Mosaic in Cloud
- Photo Mosaic Wall Software Setup
- PMWall Settings Guide
Was this helpful?
Related articles
PMWall (Photo Mosaic Wall) Overview
PMWall is Foto Master's next-generation Photo Mosaic Wall software for Windows. It transforms individual guest photos into tiles that are intelligently placed into a large-scale mo
PMWall Licensing and Activation
PMWall licenses are managed in Foto Master Cloud and activated on a specific computer. This article covers signing in, activating, and checking license status. Sign In PMWall opens
Migrating from Legacy Photo Mosaic Wall to PMWall
PMWall replaces the legacy Photo Mosaic Wall software. If you have run mosaic activations before, most of your experience carries over -- the same main image, grid, blending, and m
PMWall Dashboard & Runtime
PMWall has four tabs: Dashboard, Runtime, Queue Management, and Settings. This article covers the first two, which is where you spend an event. Start Mosaic sits in the window head
PMWall Queue Management and Moderation
The Queue Management tab monitors upload, download, and moderation activity for the selected event. It is where you go when photos are not appearing on the wall, and where you appr