Why the Camera Photo Does Not Fit the Layout Container
Use this guide when a camera photo or AI-processed photo does not line up correctly with the camera area in a layout. The photo may appear too small, cut off, stretched, or misaligned with the transparent part of the frame.
This usually happens because the camera photo and the camera container in the layout do not use the same aspect ratio.
At a Glance
| You see | What it means | What to do |
|---|---|---|
| The photo has blank space around it | The photo and container ratios do not match, and Scaling Mode is set to Fit | Match the container aspect ratio to the camera photo and keep Fit |
| The photo or overlay is cut off | The photo and container ratios do not match, and Scaling Mode is set to Crop | Match the ratio, or accept that Crop trims the edges |
| The person looks stretched or squashed | Scaling Mode is set to Fill | Avoid Fill; match the ratio and use Fit |
The real fix is to make the camera container the same shape as the photo produced by the camera.
Symptoms
You may see one or more of these results:
- The camera image does not fill the transparent area of the frame.
- Empty space appears around the photo.
- Part of the photo, logo, or subject is cut off.
- The person looks stretched or squeezed.
- The issue appears only in the final output, even though the layout looks correct in the editor.

Your camera produces a photo with a fixed shape, called its aspect ratio.
The camera container in the Layout Builder also has a shape, based on the selected Aspect Ratio.
If the camera photo and the layout container use different ratios, the system has to decide how to place one shape inside another. The selected Scaling Mode controls how the mismatch appears.
Fitkeeps the full photo visible, but may leave blank space.Cropfills the container, but may cut off part of the photo.Fillforces the photo into the container, but may stretch the subject.
The scaling mode is not the real problem. It only changes how the ratio mismatch appears.
Once the camera container ratio matches the actual camera photo ratio, the image should fit correctly with Scaling Mode: Fit.
Common Camera Aspect Ratios
To match the container correctly, first check what ratio your camera produces.
| Camera type | Common source ratio | Portrait layout ratio |
| DSLR / mirrorless | 3:2 | 2:3 |
| 16:9 webcam | 16:9 | 9:16 |
| Standard 4:3 webcam | 4:3 | 3:4 |
| Phone camera | Often 4:3 | 3:4 |
Orientation matters. A landscape ratio becomes inverted in portrait.
Examples:
1200 × 1800=2:31800 × 1200=3:21080 × 1920=9:161920 × 1080=16:9480 × 640=3:4
If you are not sure, check the original captured photo resolution and reduce the width and height to the simplest ratio.
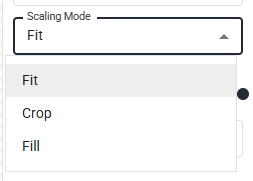
Scaling Modes Explained
The camera element has three scaling modes.
Fit
Fit preserves the photo’s original aspect ratio and shows the entire photo inside the camera container.
Use Fit when the source photo ratio matches the camera container ratio. This is the recommended setting because it does not crop or stretch the photo.
If the ratios do not match, Fit may leave empty space around the photo.
Crop
Crop preserves the photo’s aspect ratio and fills the entire camera container.
Use Crop only as a workaround when the layout cannot be changed. It usually looks better than stretching, but part of the photo may be trimmed.
Fill
Fill forces the photo to fill the entire camera container.
Avoid Fill for people, faces, products, or anything where distortion matters. It does not preserve the original aspect ratio and may make the subject look stretched.
Follow these steps in order.
1. Check the Camera Source Photo
Find the original photo captured by the camera and check its resolution.
Confirm whether the source is a DSLR, webcam, phone, or another camera type. Different cameras may produce different aspect ratios.
2. Check the AI-Processed Photo
If AI processing is used, check the AI-processed image resolution as well.
The AI-processed photo should keep the expected photo ratio. If the original photo and AI-processed photo come back with different ratios, contact Support and include both files.
Support may request:
- Original camera photo
- AI-processed photo
- Layout file
- Workflow file
3. Check the Camera Element in the Layout Builder
In the Layout Builder:
- Select the camera element.
- Open the photo/camera settings panel.
- Review:
Aspect Ratio- Custom width and height, if
Customis selected Scaling Mode
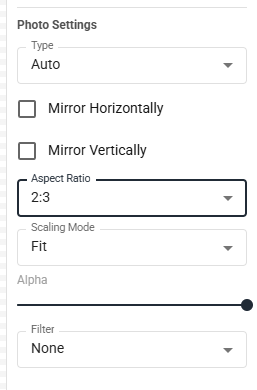
Example:
- Camera photo:
2:3 - Layout camera container:
3:4 - Result: the photo will not naturally fit the container
4. Match the Layout Ratio to the Camera Photo
The best fix is to make the camera container ratio match the real camera photo ratio.
Examples:
- If the camera produces portrait DSLR photos, set the camera element to
2:3. - If the camera produces portrait photos from a 16:9 webcam, set the camera element to
9:16. - If the camera produces standard portrait webcam photos, set the camera element to
3:4. - If the frame uses a custom opening, make sure the custom camera element ratio matches the real camera output.
After matching the ratio, set Scaling Mode to Fit.
This gives the cleanest result: no blank space, no cropping, and no stretching.
When to Use Crop
Use Crop only when the layout design cannot be changed or you need a quick workaround.
Crop fills the container while preserving the photo’s proportions, but it may trim the edges of the image. This can affect heads, hands, logos, props, or parts of the background.
[Insert screenshot: same layout using Crop as workaround]
Avoid Fill
If switching to Fill makes the photo cover the full area but the person looks stretched, the ratios do not match.
Do not use Fill as the final fix. Match the camera container ratio to the source photo, or use Crop as a temporary workaround if the layout cannot be adjusted.
Example
A 16:9 webcam used in portrait orientation may produce a 9:16 photo.
If the layout camera container is set to a custom shape that is closer to square, the photo will not naturally fit.
With Fit, the full image is shown, but large blank areas may appear.
With Crop, the container is filled, but part of the image may be trimmed.
The correct fix is to set the camera container to 9:16 and keep Scaling Mode set to Fit.
Quick Reference
| Situation | Recommended action |
| Source photo and camera container have the same ratio | Use Fit |
| Source photo and camera container have different ratios | Adjust the camera container ratio |
| Layout cannot be changed | Use Crop as a workaround |
| Subject looks stretched | Do not use Fill; check the ratio |
| AI-processed photo has an unexpected size or ratio | Contact Support with the original and processed files |
Camera image fitting issues are usually caused by mismatched aspect ratios between the camera source photo and the camera container in the layout.
The best solution is to match the layout camera element ratio to the actual camera output and use Scaling Mode: Fit.
Use Crop only when the layout cannot be adjusted. Avoid Fill when working with people, faces, products, or anything that should not be distorted.
Was this helpful?
Related articles
Booth Computer Running Slowly at Events
Common Causes Windows Update downloading in the background Antivirus scanning during the event Low disk space on the system drive Too many hours without a restart — memory buildup
License Activated but Events List is Empty
You logged in successfully, your Cloud Licenses tab shows your license as Activated, but when you open FMX (or your booth software) the events list is empty -- nothing to select, n
License Activation Issues
Activating your Foto Master software should take just a minute or two. If something isn't working, this page walks through the fixes step by step. Before anything else, confirm whi
iPad License Keeps Logging Out
You've activated an iPad license, used it successfully at one event, and the next time you open FMX (iPadOS) the license is asking you to log in again or showing as "in use elsewhe
Changing Your Email or Account Info
Changing the email address on your Foto Master account is a common request -- usually because you are switching from a personal address to a business one, transferring ownership of