
Fixing the Black Band on 4x6 Prints from a DNP DS-RX1HS Printer
Applies to: FMX for Windows + DNP DS-RX1HS printer
The Symptom
When printing 4x6 photos through FMX to a DNP DS-RX1HS, every print comes out with a large black band running down the right side of the page. Instead of a clean portrait 4x6 photo, you get a portrait image awkwardly placed on what is actually a 6x4 (landscape-oriented) page, with the leftover space rendered as solid black.
The Cause
This happens because of a mismatch between the printer's paper mode and the driver's automatic paper selection. The DS-RX1HS control panel has its own paper-size setting, and when FMX's automatic paper selection doesn't align with it, the driver lays the portrait image onto a landscape-shaped page. The unused portion of that landscape page is what shows up as the black band.
In short: it's not a corrupted file, a driver bug, or a printer defect — it's a paper-orientation mismatch between the app and the driver.
The Fix
You can resolve this directly from the printer driver's advanced settings:
Open Devices and Printers from the Windows Control Panel.
Right-click the DS-RX1 printer driver and select Printing Preferences.
Click the Advanced... button in the bottom-right of the Printing Preferences window.
In the DS-RX1 Advanced Document Settings window, expand Paper/Output.
Set Paper Size to PR (4x6) — the portrait 4x6 mode, rather than the default landscape 6x4 mode.
Click OK to apply, then close out of Printing Preferences.
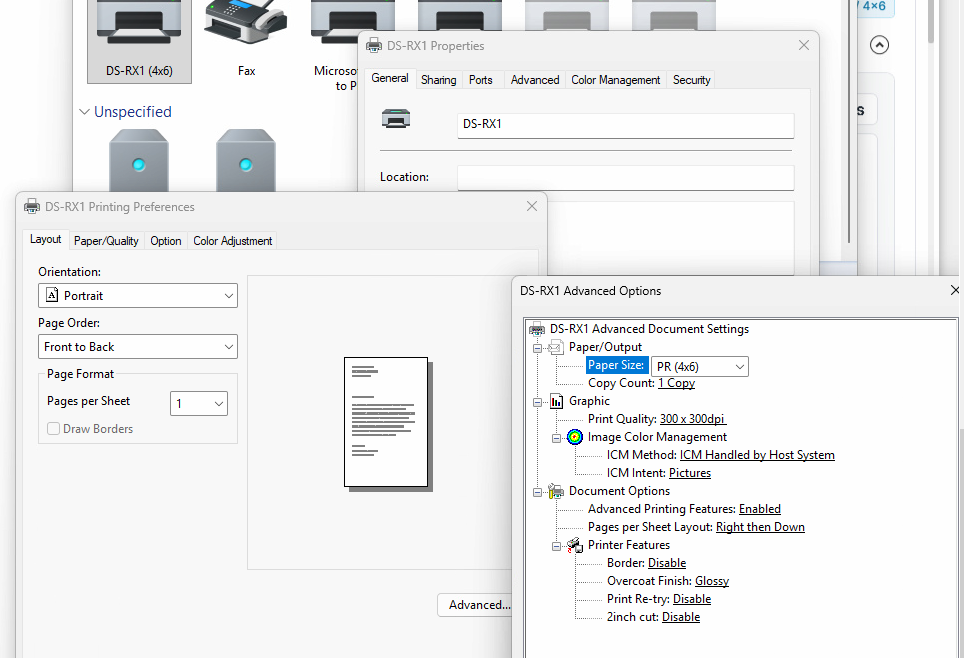
The Advanced Document Settings dialog, with Paper Size set to PR (4x6).
Once the paper size is explicitly set to PR (4x6), the driver renders the portrait image onto a matching portrait page, and the black band disappears.
Why This Works
The DS-RX1 driver supports both landscape (4x6) and portrait (PR 4x6) paper orientations for the same physical media. FMX's automatic paper selection can pick the landscape variant by default, but portrait photo prints need the portrait variant to match. Explicitly forcing PR 4x6 in the driver's advanced options removes the ambiguity and keeps the image and page orientation in sync.
Quick Reference
If you manage multiple workstations printing to the same DS-RX1HS, apply this setting on each machine's driver instance, since it's a per-driver (not per-printer-hardware) configuration.
Was this helpful?
Related articles
Photos Taken But Not Printing
Quick Checks First Is the printer powered on with the ready light solid? Is paper loaded with the ribbon from the same box? Is the USB cable connected between the printer and booth
Booth Computer Running Slowly at Events
Common Causes Windows Update downloading in the background Antivirus scanning during the event Low disk space on the system drive Too many hours without a restart: memory buildup I
How to Export All Event Data
This article explains how to export photos, videos, guest contact data, survey results, and event statistics from Foto Master Cloud.Exporting Photos and Videos Log in to cloud.foto
License Activated but Events List is Empty
You logged in successfully, your Cloud Licenses tab shows your license as Activated, but when you open FMX (or your booth software) the events list is empty -- nothing to select, n
License Activation Issues
Activating your Foto Master software should take just a minute or two. If something isn't working, this page walks through the fixes step by step. Before anything else, confirm whi