
Email Templates
Email delivery is one of the most popular ways guests receive their photo booth photos. Foto Master Cloud lets you create branded email templates so every message that goes out reinforces your professionalism and your client's branding. This article covers how to create, customize, and test your email templates.
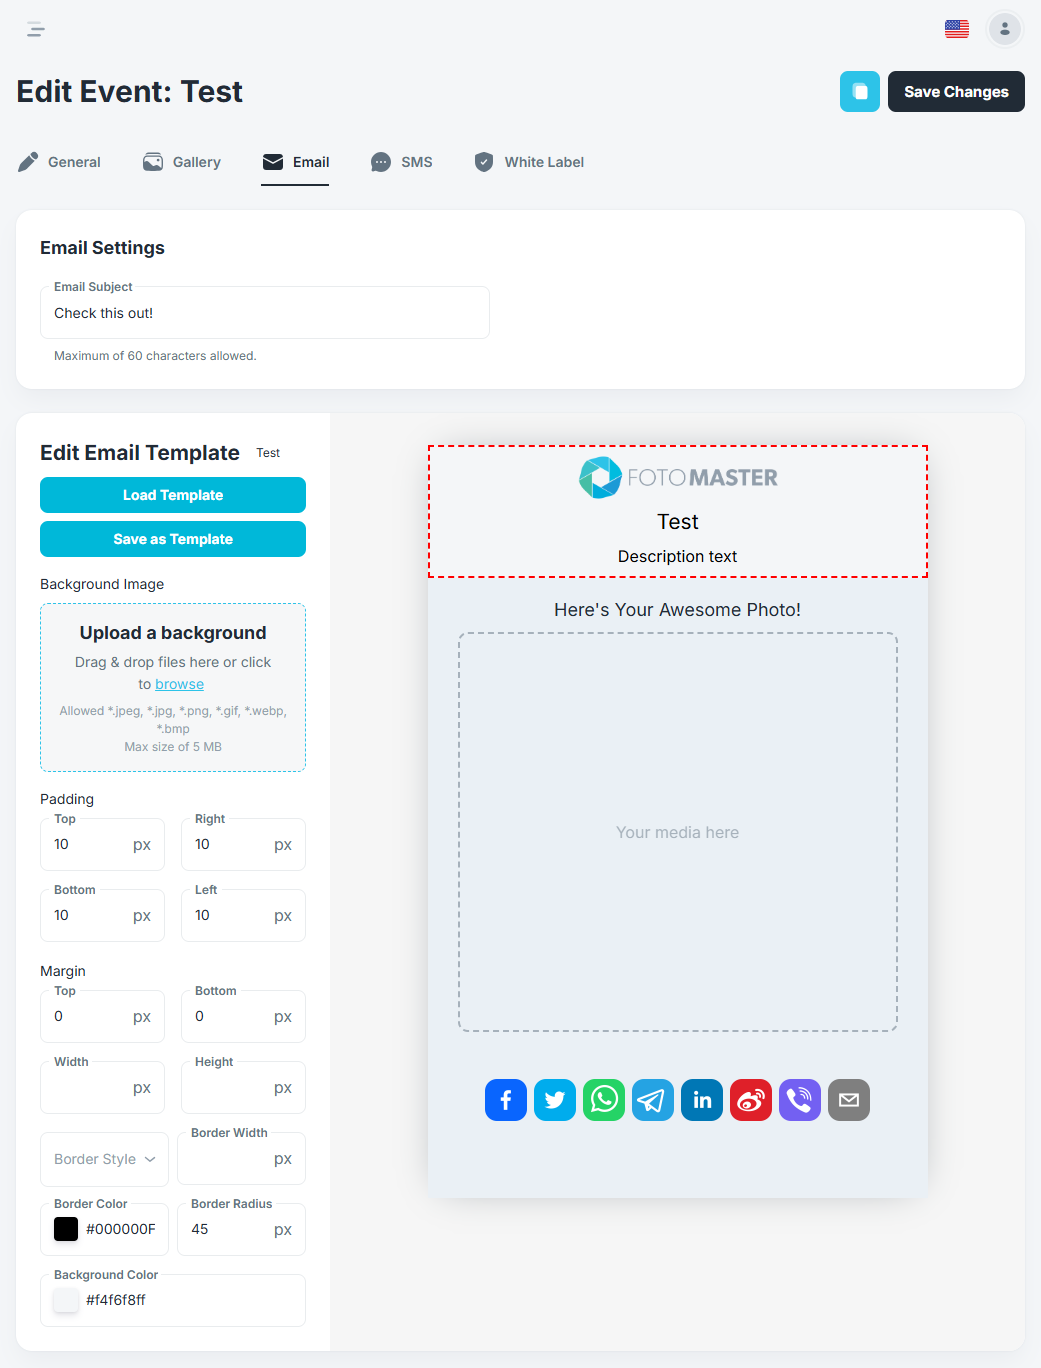
Creating Custom Email Templates
To create a new email template:
- Log in to cloud.fotomaster.com.
- Navigate to Settings > Email Templates (or Sharing > Email).
- Click + New Template.
- Enter a template name for internal reference (e.g., "Wedding Default" or "Corporate - Blue Theme").
- Design your email using the template editor.
- Click Save.
Once saved, the template is available for assignment to any event. You can create as many templates as you need for different event types, clients, or branding styles.
Available Template Variables
Template variables let you insert dynamic, event-specific information into your emails automatically. Use these variables in your email subject line and body:
- Guest Name -- The name the guest entered at the booth.
- Event Name -- The name of the event.
- Event Date -- The date of the event.
- Photo Link -- A direct link to the guest's individual photo landing page.
- Gallery Link -- A link to the full event gallery.
- Company Name -- Your business name as configured in your account settings.
- Download Link -- A direct download link for the photo file.
Variables are inserted using placeholder syntax (e.g., {{guest_name}}, {{event_name}}). The template editor provides a list of available variables and lets you insert them with a click.
Tip: Always include the {{photo_link}} or {{download_link}} variable in your email. This is the primary reason guests share their email -- to receive their photo.
Branding Your Emails
Make your emails look professional and consistent with your brand:
Logo
- Upload your company logo (or the client's logo for white-label events) to appear at the top of the email.
- Recommended size: at least 300px wide for sharp display on all devices.
Colors
- Set the header color, button color, and text color to match your brand palette.
- Use high-contrast combinations for readability, especially for call-to-action buttons.
Layout
- Choose from available email layout options (single column, header with sidebar, etc.).
- Customize the header, body, and footer sections independently.
Footer
- Add your company contact information, website URL, and social media links.
- Include any legally required information, such as unsubscribe links or privacy notices.
Custom Content
- Write a personalized message for the email body. Use a friendly, professional tone.
- Include a call to action (e.g., "View Your Photo," "Visit the Gallery," "Share on Social Media").
Testing Email Delivery
Before using a template at a live event, always test it:
- Open the email template you want to test.
- Click Send Test Email.
- Enter your own email address.
- Click Send.
- Check your inbox (and spam folder) for the test email.
- Verify that:
- The email renders correctly on desktop and mobile.
- Your logo and branding appear as expected.
- Template variables are replaced with sample data.
- Links are working and point to the correct destinations.
- The email doesn't get flagged as spam.
Tip: Send test emails to multiple email providers (Gmail, Outlook, Yahoo) to ensure consistent rendering. Email display can vary between providers, and testing helps catch issues before your guests do.
Managing Email Templates
From the Email Templates section, you can:
- Edit existing templates to update content or branding.
- Duplicate a template to create a variation (useful for creating client-specific versions of a base template).
- Delete templates you no longer need.
- Set a default template that's automatically assigned to new events.
Was this helpful?
Related articles
Managing Your Event List
Managing Your Event List If you created an event with settings you would like to reuse, you can duplicate it instead of starting from scratch. This is useful when you want to keep
Guest Data and Privacy
What Guest Data Does Foto Master Collect? When you run a Foto Master event, guest data may be collected depending on the sharing and survey options you enable. The types of data co
Licensing: Legacy Lifetime vs. Current Subscription
Foto Master has used both lifetime and subscription licensing models. This article explains what each model covers, how Foto Master Cloud is billed, and the specific upgrade rules
Managing Your Cloud Plan: Upgrades, Downgrades, Grace Period, and Cancellation
Manage Foto Master Cloud plans from Cloud > Billing and software licenses or 24/7 Support from Cloud > Licenses. This article explains the different effects of upgrading, dow
Adding Credits to Your Cloud Account
You can purchase additional AI Credits manually or enable optional auto-recharge in Foto Master Cloud. Available packages, rates, minimums, recharge settings, and the amount charge