
How to Create and Print Lenticular Photos in FMX for Windows
FMX can combine two or three photos into a 4×6 lenticular print - tilting the finished card reveals a different photo at each viewing angle.
This guide covers the complete process: building the workflow, configuring a local printer, calibrating the printer and lens, testing the guest experience, and attaching the lens to the print.
Important: A lenticular print is made of very fine interlaced lines. The bare print may look striped or distorted. This is expected. The image-changing effect appears only when the correctly calibrated lens is aligned over the print.
Before You Start
Prepare the following:
| Requirement | What you need |
|---|---|
| FMX | The latest FMX for Windows release with the Photos to Lenticular workflow feature |
| Source photos | Two or three different Raw Photos or AI Photos from the same session |
| Printer | A local printer route configured for 4×6 media |
| Lenticular lens | A 4×6 lens sheet marked 40, 50, 60, 75, or 100 LPI |
| Measuring tool | A millimeter ruler for the geometry calibration sheet |
| Lens mounting | Adhesive-backed lens stock, clear tape, a laminating method, or a repeatable alignment jig |
Use the same printer, driver settings, paper, finish, and physical lens stock during calibration that you will use at the event. Changing part of the physical print path can change the alignment.
1. Build the Lenticular Workflow in Foto Master Cloud
The workflow must create all source photos before it creates or prints the lenticular image.
Use this sequence:
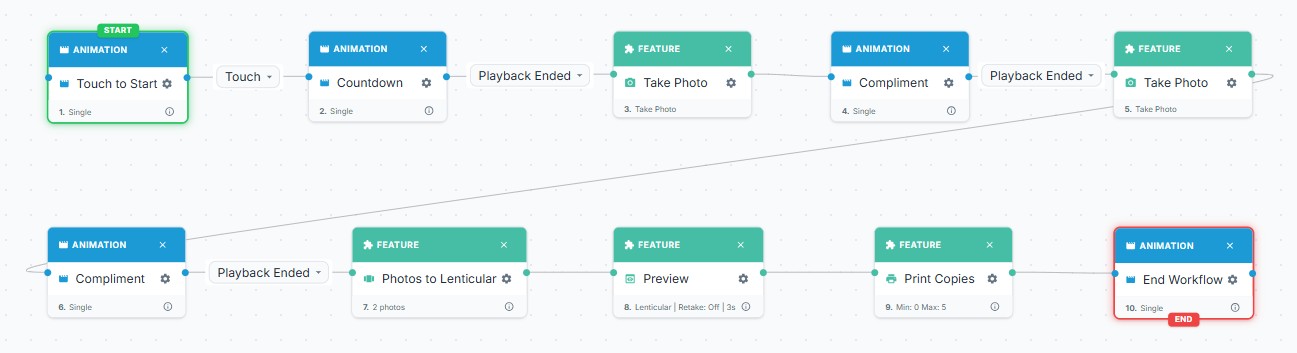
Take Photo or AI Photo sources → Photos to Lenticular → Lenticular Preview (optional) → Print Copies
Here's an example of a workflow that takes 2 photos (no AI) with preview and print:
Add the source photos
- Add the Take Photo steps required for the effect.
- If the effect will use AI results, place each AI Photo step after its source photo.
- Keep the photos in the order in which they should appear while the finished card is tilted.
The sources must be unique. A two-photo lenticular requires exactly two selected sources, and a three-photo lenticular requires exactly three.
Add Photos to Lenticular
- Add Photos to Lenticular after all of its source photos.
- Set Number of Photos to 2 or 3.
- Select each Raw Photo or AI Photo in the required viewing order.
This step has no orientation setting. FMX derives the card orientation from the first selected photo: a landscape source produces a landscape 4×6 card, and a portrait source produces a portrait card.
Because of this, the first selected photo decides which calibration profile the job needs. Keep every selected photo in the same intended orientation, and make sure that orientation matches the card orientation approved during printer calibration.
FMX center-crops the selected images to fill the 4×6 card without stretching them. Keep important faces, text, and details away from the extreme edges of the source photos.
Add an optional Lenticular Preview
Add a Preview step and set Preview Type to Lenticular if guests should see the image-changing effect on screen.
The preview animates the original source frames; it does not display the striped print raster. It is useful for confirming photo order and letting guests accept or retake the session, but it does not replace a physical calibration test.
Add Print Copies
- Add Print Copies after Photos to Lenticular.
- Set Media to Print to Lenticular.
- Set Print Mode to Auto Print One Copy or Show Copy Selection.
- Configure the minimum, maximum, and Skip behavior required for the event.
Print Copies has no paper size setting. The 4×6 media comes from the printer route you configure in the next section, not from the workflow step.
Save the experience, then sync it to FMX. For more general printer settings, see Printing from FMX.
2. Configure the 4×6 Printer Route in FMX Software
Open Global Settings → Devices → Printer.
Windows printer route
- Create or enable a 4×6 local printer assignment.
- Select the physical printer by name. Do not leave the route set to the changing Windows default printer.
- Confirm that the assignment is for Photo 4×6 media.
- Click Save Changes before opening calibration.
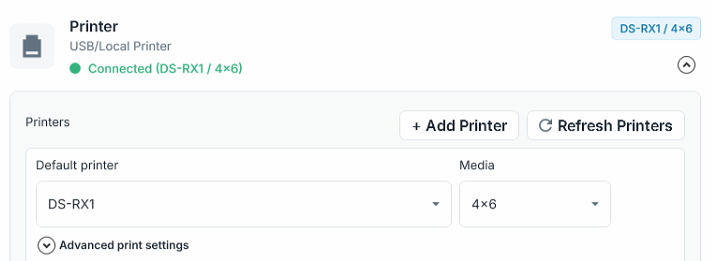
FMX ties the calibration to the selected physical route. A route that follows the Windows default printer cannot be calibrated safely because the default could later point to a different device.
Choose the lenticular output method
An explicit 4×6 assignment can show a Lenticular output option:
- Windows driver (compatible) is the default and works through the installed Windows printer driver.
- DNP RX1/RX1HS exact command (opt-in) is a dedicated lenticular path for supported RX1/RX1HS setups. Use it only after testing the complete booth setup.
Changing this setting changes the physical print path. Recalibrate the lens after switching between the Windows driver and exact-command output.
If your booth uses the DNP hot-folder backend, configure the 4×6 default or matte hot folder before calibration. The calibration wizard will show that hot-folder route as the target.
FMPrint is not supported for lenticular printing. Lenticular rasters are local print assets and are not uploaded as Final Photos. Use a local Windows-driver or configured DNP hot-folder route.
If printer load balancing is enabled, calibrate every 4×6 printer that may receive a job. A profile measured on one physical printer must not be reused for another printer.
3. Calibrate the Printer and Lens
Open Global Settings → Devices → Printer → Lenticular Calibration, then select Calibrate 4×6 Lens.

The wizard saves one active calibration for a physical printer route and lens setup. Follow all nine stages before using the effect at an event.
Stage 1: Select the route and lens
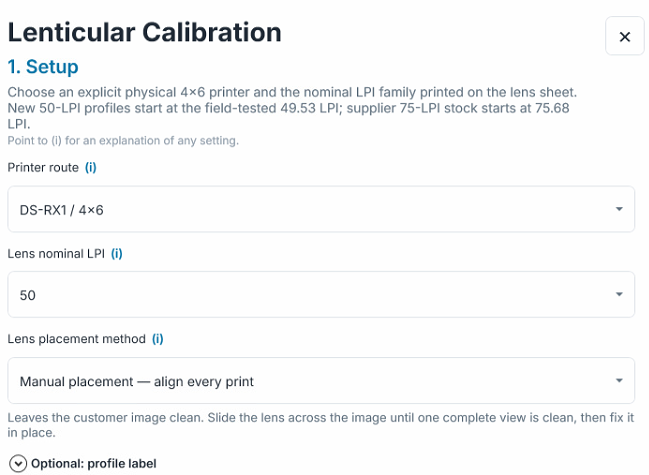
- Select the exact 4×6 printer or DNP hot-folder route.
- Select the nominal LPI printed on the lens package (in the example above, we used 50 LPI)
- Choose the lens placement method:
- Manual placement when an operator aligns each loose lens sheet by hand.
- Fixed jig only when physical stops return every print and lens to the same position.
- Optionally enter a profile label to distinguish this lens stock from other sheets.
A profile name is only an identifier. Entering a manufacturer or product name does not load a preset.
Stage 2: Measure print geometry and choose orientation
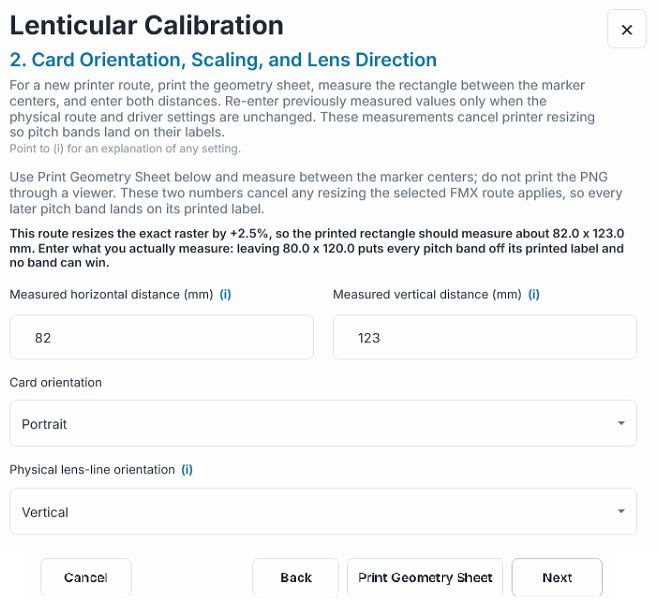
- Select Print Geometry Sheet in the wizard.
- Measure between the horizontal marker centers and enter the result in millimeters.
- Measure between the vertical marker centers and enter the result.
- Select the customer card orientation: Portrait photo or a Landscape photo.
- Select the physical lens-line orientation:
- Vertical when the ridges run from top to bottom on the finished card.
- Horizontal when the ridges run from left to right.
Always print calibration sheets from the wizard. Printing an exported PNG through an image viewer can add scaling and invalidate the test.
See Video on how to confirm from the Print Geometry Sheet which Physical lens-line orientation you are using:
Stage 3: Find the coarse pitch
- Print the coarse pitch sheet.
- Place the smooth side of the lens against the print, with the ridges facing you.
- Keep the lens ridges parallel to the printed interlace lines.
- Tilt across the ridges and inspect every labeled candidate.
The winning row or column changes as one solid area from blue to red. A candidate that shows repeated red and blue bars is off pitch. Fewer bars means that candidate is closer.
If the best candidate is at the first or last edge of the sheet, return to the geometry stage and recheck the measurements. The correct pitch may be outside the printed test range because the route scaling was entered incorrectly.
See Video showing how this test looks:
Stage 4: Fine-tune the pitch
Print the fine pitch sheet and repeat the same test. Choose the exact labeled value whose full row or column changes together with the least visible wave or color mixing.
The printed result under the real lens is authoritative. Do not select a value only because it matches the number printed on the lens package.
See Video showing how this fine-tuning looks:
Stage 5: Choose the cleaner edge mode
Print the optional boundary comparison sheet and compare Blended with Hard Edge through the real lens.
Select the side that produces the cleanest separation between complete views with the least ghosting. If both appear equal, Blended is a good starting choice.
See Video showing how this test looks:
Stage 6: Complete lens registration
The correct procedure depends on the placement method selected in Stage 1.
Fixed jig
- Lock the lens and print against the same physical stops that will be used in production.
- Print the phase sheet for the selected card orientation.
- Tilt each numbered patch.
- Select the patch that shows a clean blue view at one angle and a clean red view at the other, with the least mixing or drift.
Do not reposition the lens separately for each patch. The phase is reusable only when the jig returns every lens to the same position.
Manual placement
FMX does not add alignment marks to customer prints. For every production print:
- Keep the lens ridges parallel to the printed interlace lines.
- Slide the lens perpendicular to its ridges until one complete source image is clean across the card.
- Hold the lens in position before taping, laminating, or exposing the adhesive.
Stage 7: Balance the first two images
Choose 45/55, 50/50, or 55/45. Use the optional balance sheet if one of the first two views appears stronger or clearer than the other. This setting is a matter of preference regarding which source photos will be more visible.
Three-photo lenticular jobs always divide the viewing area equally among all three images.
See Video showing how these options look as a test:
Stage 8: Validate the finished orientation
Print the optional validation card that matches the selected portrait or landscape orientation. Testing a physical card is strongly recommended before an event.
Confirm that:
- One angle shows the complete blue VIEW A image.
- The opposite angle shows the complete red VIEW B image.
- Text, grid lines, and color change together as one full view.
- There is no persistent wave, repeating bands, mixed color, or edge-to-edge drift.
Approve the selected card orientation in the wizard. A profile approved for portrait cards does not authorize landscape jobs, and vice versa.
See Video showing how the views should look:
Stage 9: Review, save, and activate
Review the printer route, card orientation, LPI, scale, ridge direction, registration method, edge mode, and image balance. Select Save Profile to store and activate the calibration.
Saved profiles can later be activated, renamed, recalibrated, or deleted from the Lenticular Calibration section.
4. Test the Complete Experience
Run at least one full session before the event:
- Confirm that all two or three source photos are captured or generated.
- Confirm that the on-screen Lenticular Preview changes through the photos in the intended order.
- Print through the workflow's Print Copies step.
- Confirm that the job reaches the same 4×6 route used for calibration.
- Align the production lens and inspect every viewing angle.
- Attach the lens only after the complete card passes the physical check.
Do not manually open and print files from the event's Lenticular folder. Only the FMX lenticular Print Copies path preserves the calibrated printer route and raster handling.
5. Run the Effect at an Event
During each session, FMX:
- Captures or generates the selected source photos.
- Creates the lenticular print asset in the configured order.
- Shows the animated source-frame preview, if included.
- Queues the requested number of calibrated 4×6 lenticular copies.
For manual placement, leave the lens backing in place while aligning it. Slide the lens across the ridges until a complete source view appears clean across the card. Secure one edge, then expose and press the adhesive gradually without allowing the lens to shift.
For a fixed jig, keep the same stops, lens orientation, and placement process that were used during phase calibration.
Troubleshooting
The Lenticular Preview shows the Final Photo instead
- Confirm that Photos to Lenticular appears before the Preview step.
- Confirm that the selected source photos were successfully created.
- Confirm that the number of selected sources matches the configured two- or three-photo count.
- Confirm that the Preview Type is Lenticular.
FMX does not create a lenticular print job
- Confirm that Print Copies appears after Photos to Lenticular.
- Set Media to Print to Lenticular, not Final Photo.
- Set the paper size to 4×6.
- Use a local Windows or DNP hot-folder route; FMPrint cannot print lenticular output.
Calibration cannot select the printer
- Select the physical printer explicitly in the 4×6 assignment.
- Do not use Default Printer for the calibrated route.
- Click Save Changes, then reopen Lenticular Calibration.
- For a DNP hot-folder route, configure the 4×6 folder first.
The print shows a moving wave
The effective pitch is incorrect. Recheck the geometry measurements, then repeat the coarse and fine pitch stages under the actual production lens.
Both photos remain visible at the same angle
- Confirm that the lens ridges match the selected line orientation.
- Recheck the fine pitch and edge mode.
- For a fixed jig, repeat phase calibration without moving the lens between patches.
- For manual placement, slide the lens perpendicular to the ridges before attaching it.
The job reports an orientation mismatch
The card orientation comes from the first photo selected in Photos to Lenticular, so the mismatch means that photo is producing the orientation the active profile was not approved for. Reorder the selected photos so the first one matches the approved orientation, or recalibrate if you need to offer the other card orientation.
Results vary between prints or printers
- Confirm that the same physical printer route handled every job.
- Calibrate every printer in a load-balanced pool.
- Check that the driver, media, finish, and Lenticular output transport have not changed.
- Confirm that a fixed jig still returns the print and lens to the calibrated stops.
When to Recalibrate
Recalibrate after changing any of the following:
- Physical printer or printer route
- Printer driver, page settings, or scaling behavior
- Windows-driver versus RX1/RX1HS exact-command output
- Lens stock, nominal LPI, or supplier batch
- Portrait versus landscape card orientation
- Lens ridge direction
- Fixed-jig stops or mounting method
Always complete a physical validation print after recalibration and before serving guests.
Was this helpful?
Related articles
FMX for Windows: Customizing Your Experience
Everything at a photo booth event (the overlays, the countdown, the on-screen text, the email guests receive, the gallery they get a link to) is something you control. This guide m
FMX for Windows: System Requirements
Before installing FMX on your Windows computer, make sure your system meets the requirements below. Meeting the recommended specifications will ensure smooth performance during eve
Installing FMX on Windows
When to Use First-time installation of FMX on a Windows PC Reinstalling FMX on the same machine Upgrading FMX to a newer version using the latest installer Requirements Windows 10
Login to FMX
When to Use Immediately after installing FMX When switching operators or moving the license to a different PC Requirements A Foto Master Cloud Account (email and password) At least
Building a FMX Preset From Scratch: Video Tutorial
This video covers the basics of building a workflow and layout in FMX: a good starting point before exploring the individual workflow step articles.