
Preview: Complete Setup Guide
The Preview step shows guests a photo, layout, video, GIF, Flipbook, or Lenticular result before the workflow continues. It can advance automatically, wait for the guest to keep or retake the result, and offer interactive photo filters.
Preview displays session media and can compose a Final Photo for display. Add Save Final Photo later when you need an explicit, fixed checkpoint before another consumer; common print, sharing, Cloud, and session-end paths can also prepare final media on demand.
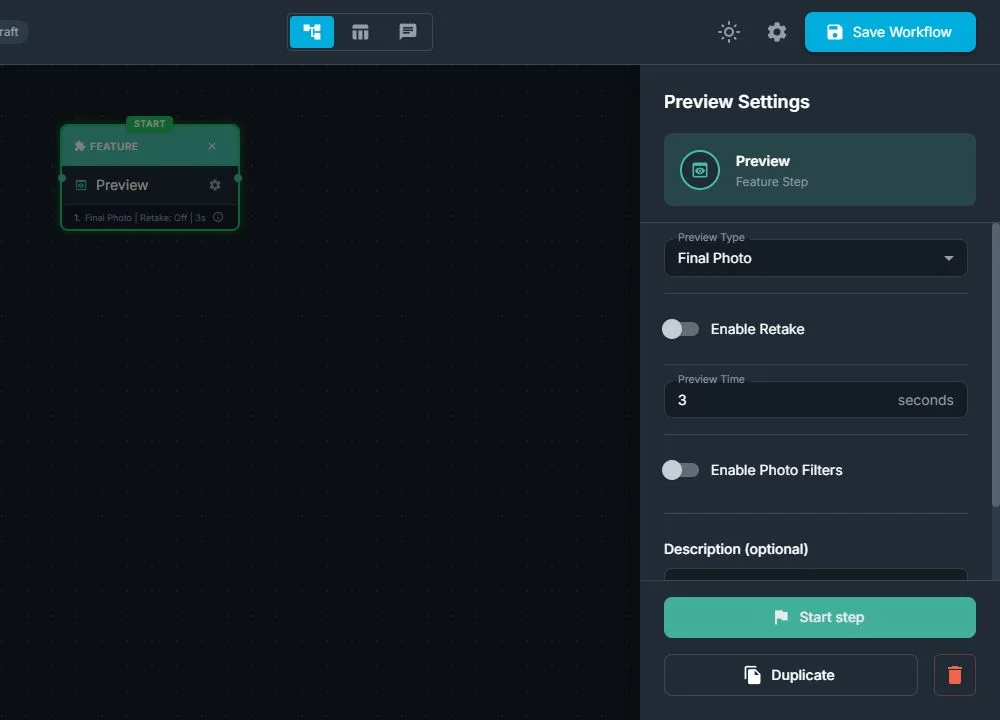
Preview Types
The Workflow Builder offers only the Preview Types supported by media-producing steps in the workflow.
| Preview Type | What the guest sees | Typical source |
|---|---|---|
| Raw Photo | An individual captured photo before the final layout is composed | Take Photo or physical Canon shutter |
| Final Photo | The completed photo layout with its current sources, overlays, and selected effects | Layout plus captured or AI photos |
| Raw Video | The original recorded video | Record Video or Screen Recording |
| Final Video | The processed or composed video | Video processing or Video Fusion |
| GIF | A generated animated GIF | Compatible or legacy GIF-producing workflow |
| Flipbook | An animated preview of the generated flipbook frames | Video to Flipbook |
| Lenticular | An on-screen animation of the ordered lenticular source views | Photos to Lenticular |
Raw Photo and Final Photo are always available because a compatible Canon body can create a Raw Photo through its physical shutter even when the workflow has no Take Photo step. If that is not intentional, add Take Photo before Preview.
Raw Photo Versus Final Photo
Choose Raw Photo when the guest should inspect one captured image before layout composition.
Choose Final Photo when the guest should see the complete output, including:
- The selected photo layout
- All camera spaces
- AI or filtered source choices
- Drag & Drop Layout assignments
- Overlays, backgrounds, text, and other layout elements
Final Photo Preview renders the layout for display. A later Save Final Photo step can explicitly fix that state as the session output when the workflow needs a deterministic checkpoint.
Configure Automatic Preview
When Enable Retake is off:
- Photo and Lenticular previews use Preview Time in seconds.
- Raw Video, Final Video, GIF, and Flipbook use Loop Count.
- For Raw Video, Final Video, and GIF, Loop Count 0 plays once.
- For Flipbook, Loop Count 0 loops continuously; use a positive number for a finite number of flip-throughs.
Choose enough time for the guest to inspect or scan the result without unnecessarily slowing the booth.
Configure Retake
- Enable Enable Retake.
- Choose Retake Step.
- Select the earlier instruction, Live View, Take Photo, or other step that should restart the capture section.
- Confirm that the normal outgoing route continues after the guest keeps the result.
The Retake Step list uses the workflow’s actual nodes. Send the guest back far enough to repeat all required preparation, but not so far that a payment or one-time external action runs again.
Enable Photo Filters
Photo filters are available for Raw Photo and Final Photo previews. On Windows, enable photo filters and choose which filters the guest can select:
- No Filter
- Black & White
- Sepia
- Extra Sharp
- Pencil
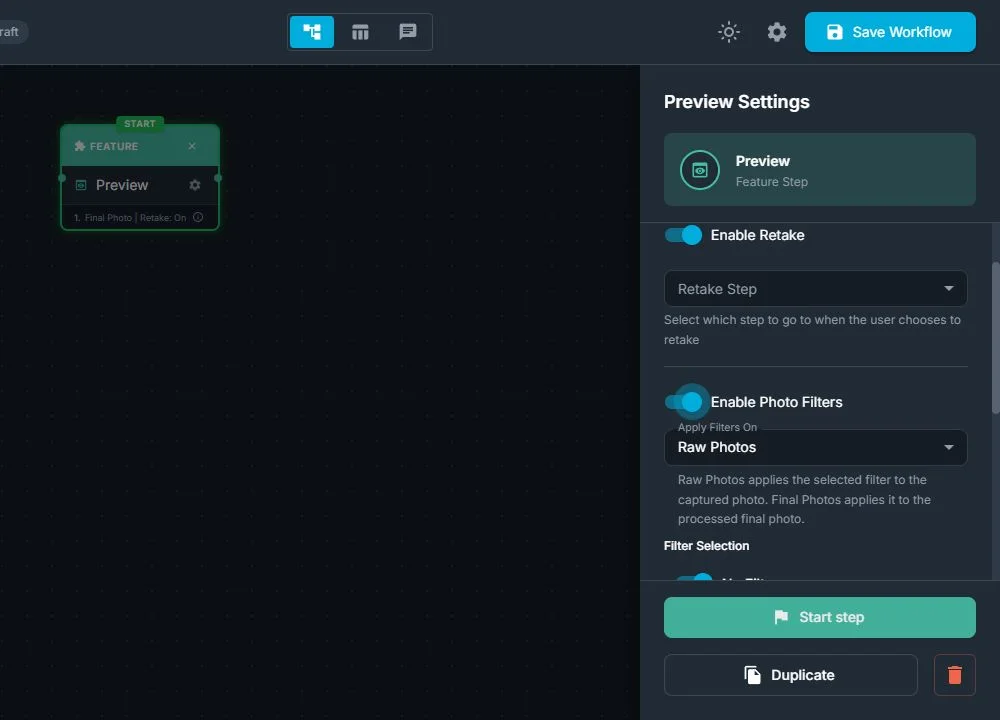
The guest sees touch-friendly filter choices and selects the preferred look before continuing.
Apply Filters On: Raw Photos or Final Photos
When Preview Type is Final Photo and photo filters are active, the Builder shows Apply Filters On.
Raw Photos
This is the legacy/default behavior. FMX applies the guest’s selected filter to the source photos used by the layout, then composes the Final Photo.
Use Raw Photos when:
- Only the guest photos should change
- The layout’s branding and graphic colors must remain untouched
- Several camera spaces should receive the same selected filter
- A Drag & Drop Layout contains guest-selected Raw or AI Raw Photos
For an active Drag & Drop Layout, FMX records filtered versions against the guest’s assigned sources so the final layout preserves both the placement and the filter choice.
Final Photos
FMX first composes the completed Final Photo and then applies the selected filter to the flattened result.
Use Final Photos when:
- The entire output should share one visual treatment
- Borders, logos, text, and backgrounds should also be filtered
- You want a monochrome or stylized version of the complete design
Design warning: A Final Photos filter can change brand colors and sponsor logos. Test every enabled filter with the actual layout.
Recommended Workflow Patterns
Confirm a captured photo
Take Photo → Preview Raw Photo with Retake → AI or Layout → Save Final Photo
Choose a filter for the completed design
Take Photo → Preview Final Photo with filters → Save Final Photo → Print or Share
Filter guest-selected layout photos
Photo sources → Drag & Drop Layout → Preview Final Photo → Apply Filters On Raw Photos → Save Final Photo
Preview an AI result
Take Photo → AI service → loading Animation with AI Processed trigger → Preview → Save Final Photo
Do not connect Preview directly after an asynchronous AI service without an AI Processed wait when the AI output is required.
Save, Sync, and Test
- Save the workflow in Cloud.
- Sync the event to FMX.
- Produce each configured media type.
- Test Keep/Continue and Retake.
- Select every enabled filter.
- Confirm whether the filter changes only layout photos or the whole Final Photo.
- Complete Save Final Photo and inspect the file used for printing and sharing.
- Start a second session and confirm no selection carries over.
Troubleshooting
The required Preview Type is missing
Add the media-producing step first. Flipbook requires Video to Flipbook, Lenticular requires an upstream Photos to Lenticular step, and video/GIF choices require a matching video or GIF source.
Preview shows the Raw Photo instead of the AI result
Place an Animation with an AI Processed trigger between the AI service and Preview, then choose the appropriate Preview Type.
The layout is correct in Preview but the printed result is different
Add or verify Save Final Photo after Preview. Confirm the print/share step uses Final Photo and runs after the selected filter or layout assignment is recorded.
The sponsor logo changes color
Change Apply Filters On from Final Photos to Raw Photos so FMX filters only the layout’s photo sources.
Drag & Drop photos lose their filter
Keep Drag & Drop Layout before Preview, use Final Photo Preview, and apply the filter to Raw Photos. Then run Save Final Photo after the guest confirms.
Retake returns to the wrong place
Select a different Retake Step and test every branch that can reach this Preview.
Video or GIF stops too soon
Increase Loop Count. For Raw Video, Final Video, and GIF, 0 produces one play. For Flipbook, 0 loops continuously, so enter a positive value when it should finish automatically.
For guest placement, see How to Use Drag & Drop Layout in FMX for Windows. For specialized outputs, see Flipbook and Lenticular Photos.
Was this helpful?
Related articles
FMX for Windows: Customizing Your Experience
Everything at a photo booth event (the overlays, the countdown, the on-screen text, the email guests receive, the gallery they get a link to) is something you control. This guide m
FMX for Windows: System Requirements
Before installing FMX on your Windows computer, make sure your system meets the requirements below. Meeting the recommended specifications will ensure smooth performance during eve
Installing FMX on Windows
When to Use First-time installation of FMX on a Windows PC Reinstalling FMX on the same machine Upgrading FMX to a newer version using the latest installer Requirements Windows 10
Login to FMX
When to Use Immediately after installing FMX When switching operators or moving the license to a different PC Requirements A Foto Master Cloud Account (email and password) At least
Building a FMX Preset From Scratch: Video Tutorial
This video covers the basics of building a workflow and layout in FMX: a good starting point before exploring the individual workflow step articles.