
Animations in the Workflow Builder
Animations give guests visual instructions, branding, and useful feedback while FMX is waiting for an action to finish. They can welcome a guest, run behind another feature, show that AI is processing, or keep the screen active during a longer workflow.
Animation types
| Type | How it behaves | Good uses |
|---|---|---|
| Single Animation | Plays one selected image or video | Touch to Start, a countdown, an AI loader, or a payment screen |
| Random Animation | Chooses from a configured group each time the step is reached | Rotating sponsor messages, poses, or branded interstitials |
| Timeless Animation | Keeps media running across other workflow activity | Ambient overlays, augmented-reality elements, and screen-recording backgrounds |
The built-in blank or transparent animation is also valid media. Use it when the workflow needs an Animation node and its trigger, but no visible artwork should cover the screen.
Add an animation
- In Foto Master Cloud, open the event and its Workflow Builder.
- Add the required Animation type to the canvas.
- Select the node and choose its image, video, built-in media, or animation set.
- Set its playback and positioning options.
- Connect its outgoing edge and choose the trigger that should advance the workflow.
- Save, sync the event to FMX, and test on the booth display.
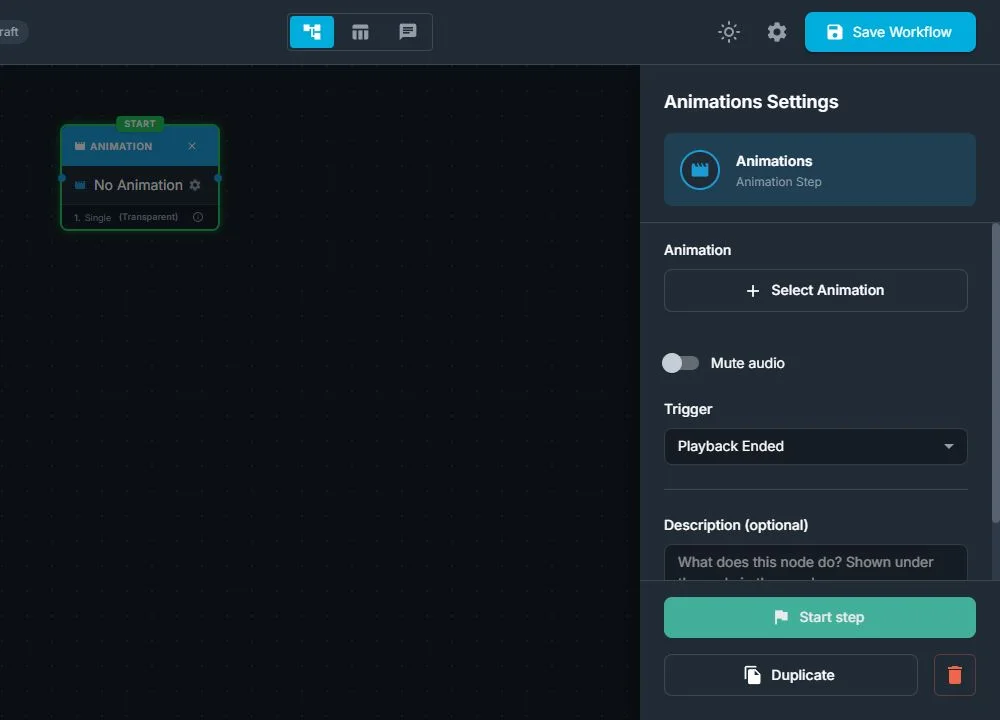
Use event media with the same aspect ratio as the booth screen. A short, seamless video works best for screens whose duration can vary.
Choose the correct trigger
The trigger belongs to the transition leaving the animation. Common choices include:
- Touch: continue when the guest taps the screen. This is the usual Touch to Start pattern.
- Time: continue after a fixed number of seconds.
- Playback Ended: continue when the selected video finishes.
- Media Saved: keep the animation visible until a capture or generated file is ready.
- AI Processed: wait for all AI work in the current batch to finish.
- Payment: keep the checkout screen visible until payment is approved.
Do not use an arbitrary Time trigger to estimate AI processing. Connect the animation with AI Processed so a fast request can continue immediately and a slow one remains covered by the loader. For several AI services in one experience, see How to Run Multiple AI Services in One FMX Workflow.
Build an AI loading screen
- Place the AI service or services after the captured source.
- Add a Single Animation with a clear processing message or branded looping video.
- Connect the loading animation to the next step with AI Processed.
- Preview the AI result only after that wait has completed.
The AI Processed transition is the wait or completion gate; it is not an AI service itself. A transparent built-in animation can provide the same wait behavior when you do not want a visible loader, although visible feedback is usually better for guests.
For very long jobs such as Seedance video generation, use a QR handoff so the guest can leave the screen and retrieve the finished result later.
Position a payment QR code
When a Single Animation is used with a Payment trigger, its editor can position the checkout QR code over the animation. Design the background with an uncluttered QR area, then place and size the QR so it has strong contrast and sufficient quiet space.
This applies to Stripe and Shopify QR checkout workflows. The QR is prepared after the guest starts checkout, so use a branded loading state that still looks intentional before the code appears. Test the finished screen with a real phone at the guest's expected distance.
Random and timeless recommendations
- Keep every Random Animation asset similar in duration so the guest journey remains predictable.
- Confirm that text and logos remain readable in every random asset.
- Use Timeless Animation sparingly; foreground media can cover buttons or previews.
- Stop or replace a timeless element before any screen where it should no longer appear.
- For screen recording, run a full test to confirm the timeless layer is included at the intended depth.
Troubleshooting
The animation never advances
Check the outgoing edge. A Touch transition needs a guest tap, Playback Ended needs playable video, AI Processed needs active AI work to complete, and Payment needs an approved checkout. If the trigger does not match the workflow action, the screen will remain open.
AI finishes but the loader remains
Confirm that all AI services in the current batch completed and that the loader's outgoing edge uses AI Processed. One failed or still-running service can keep the batch open; add a tested error route for cloud failures.
The payment QR is hard to scan
Increase its size, use dark QR modules on a light solid area, remove graphics from its quiet zone, and test at full-screen resolution. Avoid moving video immediately behind the code.
Media is blank, stretched, or cropped
Recheck the file, screen aspect ratio, and fit mode. A deliberately blank built-in animation is transparent by design; replace it if visible media was intended.
A timeless animation covers controls
Change its foreground/background placement or use a regular Animation step for that part of the workflow.
Was this helpful?
Related articles
FMX for Windows: Customizing Your Experience
Everything at a photo booth event (the overlays, the countdown, the on-screen text, the email guests receive, the gallery they get a link to) is something you control. This guide m
FMX for Windows: System Requirements
Before installing FMX on your Windows computer, make sure your system meets the requirements below. Meeting the recommended specifications will ensure smooth performance during eve
Installing FMX on Windows
When to Use First-time installation of FMX on a Windows PC Reinstalling FMX on the same machine Upgrading FMX to a newer version using the latest installer Requirements Windows 10
Login to FMX
When to Use Immediately after installing FMX When switching operators or moving the license to a different PC Requirements A Foto Master Cloud Account (email and password) At least
Building a FMX Preset From Scratch: Video Tutorial
This video covers the basics of building a workflow and layout in FMX: a good starting point before exploring the individual workflow step articles.