
How to Create, Print, and Assemble a Flipbook in FMX
The Video to Flipbook step turns a session video into a set of printed cards. When the cards are cut, placed in frame order, and bound along their white margin, flipping the pages recreates the recorded motion.
This guide covers the complete customer workflow: preparing the physical setup, building the experience in Foto Master Cloud, configuring FMX, testing the printed page order, cutting the sheets, and assembling the finished flipbook.
Important: A flipbook is a multi-page print product. Printing the first sheet successfully is not a complete test. Always print, cut, collate, bind, and flip through one full sample before the event.
Before You Start
Prepare the following:
| Requirement | What you need |
|---|---|
| FMX | A current FMX for Windows or FMX for iPadOS build with Video to Flipbook |
| Video source | A workflow that records, generates, or composes a session video |
| Printer | Windows: a local Windows printer or 6×4 DNP hot-folder route. iPadOS: an AirPrint printer |
| Paper | The same paper size and finish that will be used during the event |
| Cutting equipment | A printer cutter, guillotine, or accurate paper cutter suitable for the selected grid |
| Binding method | A heavy-duty stapler, binding press, clamp, or another secure method appropriate for the finished card stack |
| Test supplies | Enough paper for at least one complete book, including every generated page |
Use the same printer route, driver settings, paper, cutter, and binding method during testing and production. A change to the paper size or print order can change how the cards must be cut and stacked.
How FMX Builds the Flipbook
FMX performs four operations for each session:
- Resolves the selected Raw, AI, or Final Video.
- Samples the configured number of frames evenly across the video.
- Places those frames onto landscape print pages in cutting and collation order.
- Sends every page as one flipbook copy when Print Copies is set to Flipbook.
The printed frames are contain-fitted without cropping. FMX leaves a white binding margin on the left side of every card and can print a small frame number in that margin to simplify assembly.
Short videos may not contain enough unique moments for a large frame count. In that case, FMX repeats the last available frame so that the page set remains complete.
1. Build the Workflow in Foto Master Cloud
A reliable workflow creates the source video first, starts the flipbook job, waits for the job to finish, and only then previews or prints it.
Recommended sequence:
Video-producing steps → Video to Flipbook → Processing animation → Preview (Flipbook) → Print Copies (Flipbook)
A typical recorded-video flow is:
Record Video (Start) → Recording animation → Record Video (Stop) → Video to Flipbook → Creating Flipbook animation → Preview → Print Copies
Add a video-producing step
The workflow must produce a video before FMX can create the flipbook. Supported sources include:
- Record Video
- Screen Recording on FMX for Windows
- Video from Photos
- AI Image to Video
Place every step required to create the chosen video before Video to Flipbook in the guest flow. The Workflow Builder shows a warning when no video-producing step exists, but the warning does not prevent the workflow from being saved.
Here's an example of a workflow that takes 1 photo and uses the "AI Image to Video" feature to create the video and then turn that into a Flipbook:
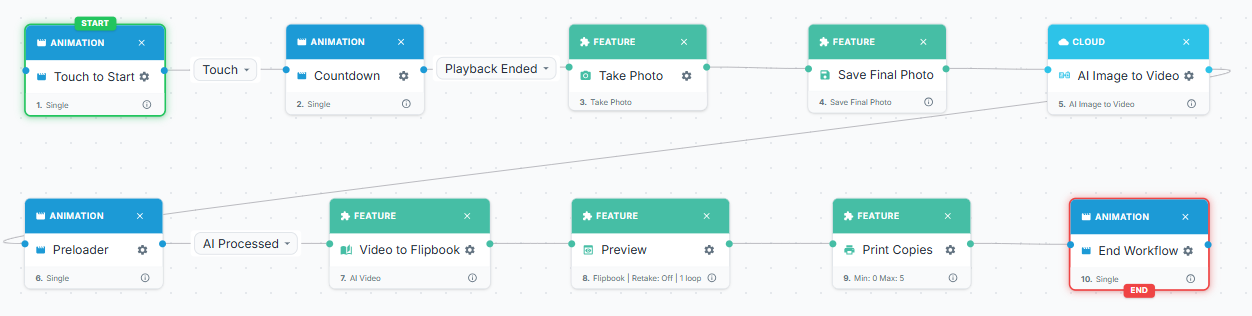
Add Video to Flipbook
- Add Video to Flipbook after the source video has been recorded or generated.
- Open Video Source.
- Select the version that should be sampled:
| Video Source | Use it when |
|---|---|
| Raw Video | You want the original recording without the Final Video layout or overlays. This is the default and usually the fastest option. |
| AI Video | The workflow contains AI Image to Video, and the generated AI motion should become the flipbook. |
| Final Video | The fully composed Final Video, including its layout or overlays, should appear on every card. This source may take longer to become ready. |
If the selected AI or Final Video cannot be created, FMX attempts to use the Raw Video so that the session can continue.
Use one Video to Flipbook step per session. Adding another conversion step does not create a second independent book; FMX reuses the session's existing flipbook job.
Wait for generation to finish
Video to Flipbook starts generation in the background and then advances immediately. To give guests clear feedback while the frames and pages are being prepared:
- Add a looping Creating Flipbook animation after Video to Flipbook.
- Connect that animation to the next step with a Media Saved trigger.
The Media Saved trigger waits for the video and flipbook jobs that belong to the session. This prevents the preview or print step from opening before the complete artifact is ready.
Add the Flipbook Preview
- Add Preview after the processing wait.
- Set Preview Type to Flipbook.
- Enable Retake if guests should be able to record another attempt.
- Configure Loop Count:
- A positive number plays that many complete flip-throughs.
- 0 keeps the flipbook playing until the guest or workflow takes another action.
Preview Time does not control a Flipbook preview. When Retake is enabled, the preview continues until the guest accepts or retakes. A retake invalidates the first flipbook and generates a new one from the replacement video.
If no flipbook becomes available, FMX may fall back to the Final Video preview or continue without showing the flip-through. Treat that behavior as a source or workflow problem rather than a successful flipbook test.
Add Print Copies
- Add Print Copies after the preview or processing wait.
- Set Media to Print to Flipbook.
- Choose Auto Print One Copy or Show Copy Selection.
- If guests select copies, configure the minimum, maximum, and zero-copy Skip behavior.
One selected copy means one complete flipbook page set, not one sheet. For example, the default 40-frame, 2×2 configuration produces ten printed sheets for each copy.
If Media to Print remains Final Photo, FMX prints the regular photo instead of the flipbook pages.
Save the experience and sync it to FMX. For more detail about these workflow steps, see Preview: Overview and Print Copies: Overview.
2. Configure FMX for Windows
Choose the page layout
Open Global Settings → Experience → Flipbook.
| Setting | Default | What it controls |
|---|---|---|
| Columns | 2 | Number of cards across each printed page; allowed range is 1–6 |
| Rows | 2 | Number of card rows on each page; allowed range is 1–6 |
| Frames | 40 | Number of moments sampled across the video; FMX adjusts it to a complete Columns × Rows multiple, up to 200 |
| Cut padding (px) | 0 | Total white space reserved at each horizontal cut; allowed range is 0–150 |
| Print frame numbers | On | Prints each sequence number in the white binding margin |
| Print Last Page First | On | Sends the final page first so page 1 ends on top of a face-up output stack |
Keep Print frame numbers enabled until the complete cutting and stacking process has been proven. The numbers are the quickest way to identify a reversed stack or misplaced pack.
Cut padding is divided across both sides of a horizontal cut. For example, a value of 8 reserves 4 pixels below the row above and 4 pixels above the row below.
Select Save Changes at the bottom of Global Settings. Leaving the panel without saving does not persist the Flipbook settings.
Select the Flipbook printer
Open Global Settings → Devices → Printer, then locate Flipbook Printer.
- Select the physical printer that will produce the flipbook pages.
- Open that printer's Windows driver preferences.
- Set the driver's default paper to the production paper size.
- Confirm landscape/borderless behavior with a complete test book.
- Save the FMX Global Settings.
FMX reads the selected printer driver's default paper when it composes the pages. Supported canvases are:
- 6×4
- 8×6
- Letter
- A4
If the driver paper cannot be identified, FMX uses 6×4. The dedicated Flipbook Printer selection takes priority; Default follows the normal local Windows route.
FMPrint is not a Flipbook print transport. Flipbook copies contain multiple locally generated pages, so FMX prints them through the local Windows driver or the supported DNP hot-folder path. Configure a valid local Flipbook Printer even when the booth uses FMPrint for ordinary photos.
The DNP hot-folder backend supports 6×4 Flipbook pages only. When using the 6x4 size, make sure to enable the 2" cut in the printer driver settings (for more information on how to do this, please see this article).
An 8×6, Letter, or A4 flipbook uses the Windows printer driver instead.
For general Windows printer configuration, see Printing from FMX.
3. Configure FMX for iPadOS
FMX for iPadOS uses the same Cloud workflow and flipbook concept, but its print path and paper selection are different.
For the complete iPad-specific workflow, exact AirPrint media mappings, print-queue behavior, and assembly instructions, see How to Create, Print, and Assemble a Flipbook in FMX for iPadOS.
Open Global Settings → Printing → Video to Flipbook.
Configure:
- Paper Size: 6×4, 2 X 2 X 6, 8×6, 2 X 3 X 8, Letter, or A4
- Cards Per Row
- Card Rows Per Page
- Cut padding (px)
- Frames
- Show Frame Numbers
- Print Last Page First
The 2 X 2 X 6 and 2 X 3 X 8 cut formats use two fixed card rows. They require a matching AirPrint cut queue; FMX does not fall back to an ordinary full-sheet queue because that would leave the pages uncut.
iPadOS Flipbook printing requires AirPrint. FMPrint, PrintPal, and Direct USB — DNP do not accept the multi-page Flipbook job in the current implementation. Configure an AirPrint assignment for the selected paper or cut format before the event.
For other iPad printer settings, see FMX for iPad: Printer and Printing Settings.
4. Print and Inspect a Complete Test Book
Run a full session using the production workflow and printer:
- Record or generate the source video.
- Confirm that the Creating Flipbook animation waits until Media Saved.
- Watch the Flipbook preview from the first through the last frame.
- Print exactly one copy from Print Copies.
- Wait for every page in the set to leave the printer.
- Keep the pages in their output order.
- Check that the paper size, orientation, white binding margins, frame numbers, and cut gaps are consistent on every sheet.
The frames printed on one sheet will not usually appear in simple numerical order. This is intentional: FMX imposes the cards so the cut packs can be collated into one sequence. Do not rearrange individual sheets because their visible numbers look separated.
If the printer delivers sheets face-up, Print Last Page First normally leaves page 1 on top. If it delivers face-down or reverses the stack internally, turn the option off and repeat the complete test.
5. Cut, Collate, and Bind the Flipbook
The exact number of cuts depends on the selected paper and grid. For the default 6×4, 2×2 layout, each sheet contains four cards and a 40-frame book uses ten sheets.
Use this general assembly process:
- Let the complete print stack settle and keep its page order unchanged.
- Make the horizontal row cuts. If the printer already cuts the page into equal strips, preserve the order in which those strips were delivered.
- Make the vertical column cuts to separate the individual card packs.
- Use the printed frame numbers to place every pack in ascending order.
- Confirm that frame 1 is on top and the highest frame number is at the back.
- Tap the stack square so every white binding margin aligns on the left.
- Clamp or bind the stack through the white margin without covering the image area.
- Flip through the entire book and confirm that the motion runs forward without jumps, reversals, or missing frames.
Safety: Use cutting and binding equipment according to its manufacturer instructions. Remove loose scraps and check that the finished book has no exposed staples, sharp corners, or unsecured pages before handing it to a guest.
Start with a low-frame test, such as 8 or 12 frames, when learning a new cutter or output stacker. Move to the production frame count only after the page-order direction and cuts are proven.
Recommended Capture Tips
- Record a short action with a clear beginning and end, such as a wave, spin, jump, or blown kiss.
- Keep the camera stable and the subject well lit.
- Keep the important action near the center of the frame.
- Avoid very long clips; the same frame count spread across a long clip produces larger jumps between pages.
- Avoid extremely short clips with a high frame count; repeated end frames can make the motion appear to pause.
- Test text and overlays at final card size. Details that look readable in a video preview may become too small after several cards are placed on one page.
Troubleshooting
Workflow Builder says the flipbook has no video
- Add Record Video, Screen Recording, Video from Photos, or AI Image to Video.
- Place the selected source before Video to Flipbook in the guest flow.
- Confirm that Video Source matches the type of video the workflow actually creates.
The Flipbook preview shows the Final Video or is skipped
- Confirm that a Video to Flipbook step exists.
- Confirm that the source video completed successfully.
- Add a processing animation after Video to Flipbook and use Media Saved to leave it.
- If AI Video or Final Video is selected, verify that the corresponding upstream step completed rather than relying on the Raw Video fallback.
Print Copies prints a regular photo
- Open Print Copies and set Media to Print to Flipbook.
- Confirm that Video to Flipbook exists in the workflow.
- Confirm that the full flipbook was generated for the active session.
The print job fails or never reaches the printer
Windows:
- Select a valid local Flipbook Printer.
- Do not rely on FMPrint for the multi-page job.
- If using a DNP hot folder, use 6×4 paper and confirm the hot-folder path is configured.
iPadOS:
- Set Printer Service to AirPrint.
- Assign an AirPrint printer for the selected paper size.
- For 2 X 2 X 6 or 2 X 3 X 8, configure the matching dedicated cut queue.
- Check the FMX print queue; a job can remain pending briefly while the flipbook pages finish generating.
The pages are cropped, scaled, or printed on the wrong paper
Windows: Set the selected Flipbook printer's Windows driver default paper to the production size, then restart the test from a new session.
iPadOS: Make the Paper Size selection match the AirPrint assignment and loaded media.
Do not manually open and print the generated page images through another application. That can change scaling, page order, or borderless behavior.
The assembled motion is backward
- Reverse the completed card stack, or change Print Last Page First for future books.
- Test whether the printer outputs face-up or face-down.
- Confirm that the cutter did not reverse one sub-stack during collation.
The motion jumps or sections are out of order
- Enable frame numbers and check for a missing or misplaced pack.
- Keep the printed pages and printer-cut strips in their delivery order.
- Verify that all pages for one copy finished before starting assembly.
- Make sure multiple copies were not mixed together.
There is too much white space or the subject looks small
FMX contain-fits each frame and preserves the white left binding margin; it does not crop the source to fill the card. Use a source video with an aspect ratio closer to the finished card and frame the subject more tightly during capture.
The cutter trims into the image
- Increase Cut padding (px) slightly.
- Recheck the physical cutter guide and page scaling.
- Confirm that borderless driver expansion is not moving the intended cut line.
- Print and cut another complete test before returning the booth to service.
The last frame repeats several times
The source video is too short for the requested number of unique frames. Record a longer action or reduce Frames.
Event-Day Checklist
Before serving guests, confirm that:
- The correct event and workflow are synced.
- The source video step completes successfully.
- The processing animation exits through Media Saved.
- Preview Type is Flipbook.
- Media to Print is Flipbook.
- The production printer and paper are selected.
- One complete page set prints per requested copy.
- Print Last Page First matches the printer's output stack.
- Frame numbers, cut padding, and binding margin are visible as expected.
- The cutter, binding equipment, and supplies are ready.
- A complete test book flips smoothly from frame 1 to the final frame.
Was this helpful?
Related articles
FMX for Windows: Customizing Your Experience
Everything at a photo booth event (the overlays, the countdown, the on-screen text, the email guests receive, the gallery they get a link to) is something you control. This guide m
FMX for Windows: System Requirements
Before installing FMX on your Windows computer, make sure your system meets the requirements below. Meeting the recommended specifications will ensure smooth performance during eve
Installing FMX on Windows
When to Use First-time installation of FMX on a Windows PC Reinstalling FMX on the same machine Upgrading FMX to a newer version using the latest installer Requirements Windows 10
Login to FMX
When to Use Immediately after installing FMX When switching operators or moving the license to a different PC Requirements A Foto Master Cloud Account (email and password) At least
Building a FMX Preset From Scratch: Video Tutorial
This video covers the basics of building a workflow and layout in FMX: a good starting point before exploring the individual workflow step articles.