
Video Builder
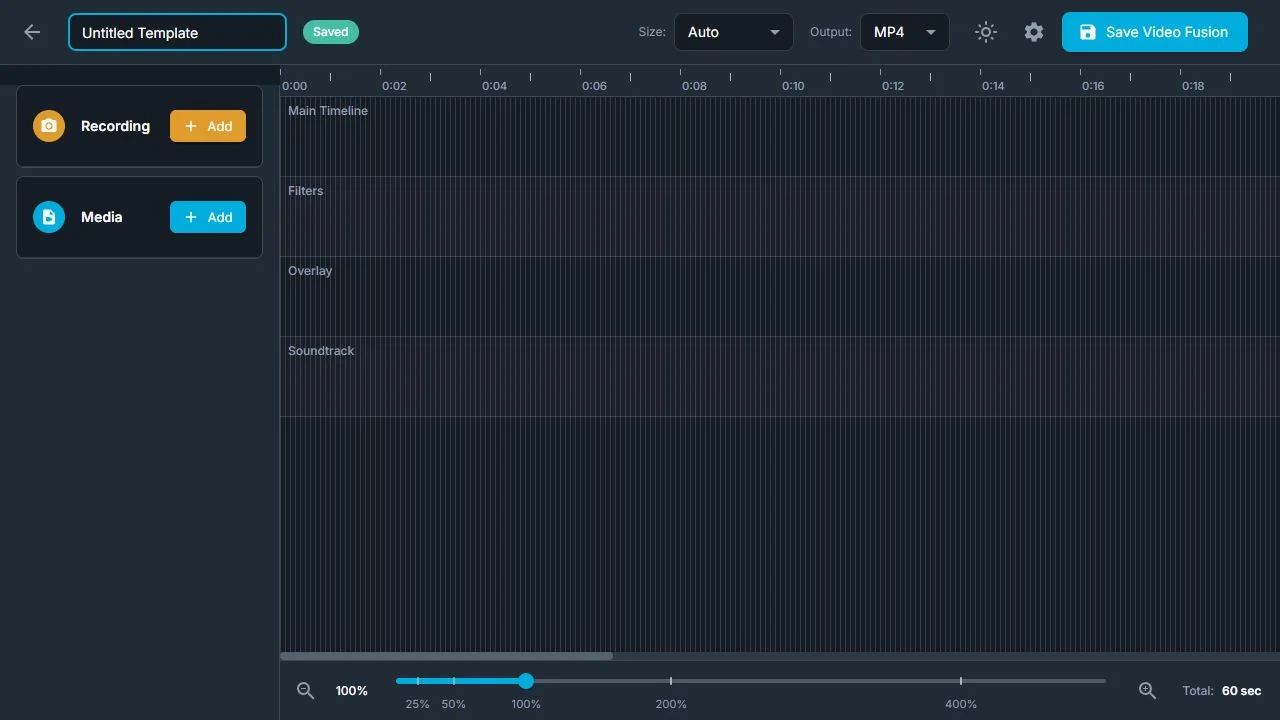
The Video Builder is a timeline-based video composition editor in Foto Master Cloud for designing video output templates. It defines how recorded video clips, photos, overlays, soundtracks, and AI effects are assembled into the final video that guests receive.
You access it from Presets → FMX (Windows) → Video Outputs, then select New Video Output or open an existing template.
What Is a Video Template?
A video template defines the composition rules for the final video output. When a guest records a video or takes a sequence of photos at the booth, the Video Builder template determines how the raw footage is assembled, what effects are applied, and what the final output looks like.
Timeline Editor
The Video Builder uses a professional-style timeline interface:
- Tracks -- Multiple parallel tracks for layering clips, overlays, and audio
- Playhead -- Scrub through the timeline to preview the composition
- Zoom -- Zoom in/out on the timeline for precise editing
- Drag and drop -- Place clips on tracks by dragging from the media library
Media Categories
The Video Builder supports six types of media that can be placed on the timeline:
Recording
The guest captured a video clip. This is the primary content of the video.
- Trim -- Set start and end trim points to use only a portion of the recording
- Speed -- Adjust playback speed (slow motion or fast forward)
- Reverse -- Play the clip in reverse
- Volume -- Adjust audio level or mute
- Loop -- Loop the clip to fill a longer timeline
- Fit mode -- Cover, contain, stretch, or native sizing
- Crop -- Crop to specific region (X, Y, width, height)
External Media
Pre-uploaded video or image files that play alongside or instead of the recording -- intros, outros, transitions, branded clips.
- Same controls as recordings (trim, speed, volume, fit mode)
- Upload from your asset library
Overlay
Transparent video or image overlays that layer on top of the recording -- animated frames, branded borders, particle effects, watermarks.
- Opacity -- Control transparency
- Position on the timeline to appear at specific moments
Soundtrack
Background music or audio tracks that play under the video.
- Volume -- Mix level relative to the recording audio
- Mute -- Toggle audio on/off
- Trim -- Use a specific portion of the audio file
- Loop -- Repeat to fill the video duration
Filters
Visual effects applied to the recording or other clips.
- Position filters on the timeline to apply at specific moments
- Adjustable intensity
AI Video
AI-powered video effects and transformations.
- AI style -- Select from available AI video styles
- Custom prompt -- Enter a text prompt for custom AI video effects
- Special AI video clip mode for AI-generated animations
Clip Properties
Every clip on the timeline has adjustable properties:
| Property | Description |
|---|---|
| Start/End time | When the clip appears and disappears |
| Duration | How long the clip plays |
| Trim start/end | Cut the beginning or end of the source |
| Speed | Playback speed multiplier |
| Reverse | Play backwards |
| Volume | Audio level (for clips with audio) |
| Muted | Toggle audio |
| Opacity | Transparency level |
| Loop | Repeat the clip |
| Fit mode | Cover, contain, stretch, or native |
| Crop | Region crop settings |
| Z-index | Layer order (front/back) |
Output Settings
- Format: MP4 or GIF
- Resolution presets:
- Landscape: 1920x1080, 1280x720, 640x480
- Portrait: 1080x1920, 720x1280, 480x640
- Auto (matches source)

Import/Export
- Export JSON -- Save your video template as a JSON file
- Import JSON -- Load a previously exported template
- Template name is displayed and editable in the top bar
Working with the Video Builder
Creating a Video Template
- In Foto Master Cloud, go to Presets → FMX (Windows) → Video Outputs.
- Select New Video Output.
- Add a Recording clip to the primary track.
- Layer overlays, soundtracks, and effects as needed.
- Set output format and resolution.
- Select Save Video Fusion.
Tips for Great Video Templates
- Keep total duration reasonable (15-30 seconds is ideal for social sharing)
- Use overlays sparingly -- too many layers can slow processing
- Test with actual footage before the event
- Match resolution to your primary sharing platform (1080x1920 for Instagram/TikTok vertical, 1920x1080 for landscape)
- Add a short branded intro or outro for professional polish
Tip: Use the grid and snapping features to align overlay elements precisely. Enable "Show Grid" and "Snap to Grid" in the top bar for pixel-perfect positioning.
Read Next
Was this helpful?
Related articles
FMX for Windows: Customizing Your Experience
Everything at a photo booth event (the overlays, the countdown, the on-screen text, the email guests receive, the gallery they get a link to) is something you control. This guide m
FMX for Windows: System Requirements
Before installing FMX on your Windows computer, make sure your system meets the requirements below. Meeting the recommended specifications will ensure smooth performance during eve
Installing FMX on Windows
When to Use First-time installation of FMX on a Windows PC Reinstalling FMX on the same machine Upgrading FMX to a newer version using the latest installer Requirements Windows 10
Login to FMX
When to Use Immediately after installing FMX When switching operators or moving the license to a different PC Requirements A Foto Master Cloud Account (email and password) At least
Building a FMX Preset From Scratch: Video Tutorial
This video covers the basics of building a workflow and layout in FMX: a good starting point before exploring the individual workflow step articles.