
Key Concepts: Workflows, Steps, Edges, and Triggers
This article covers the four core elements of every FMX workflow: Workflows, Steps, Edges, and Triggers. Understanding these concepts makes it easy to read, build, and troubleshoot any flow in FMX and the Cloud.
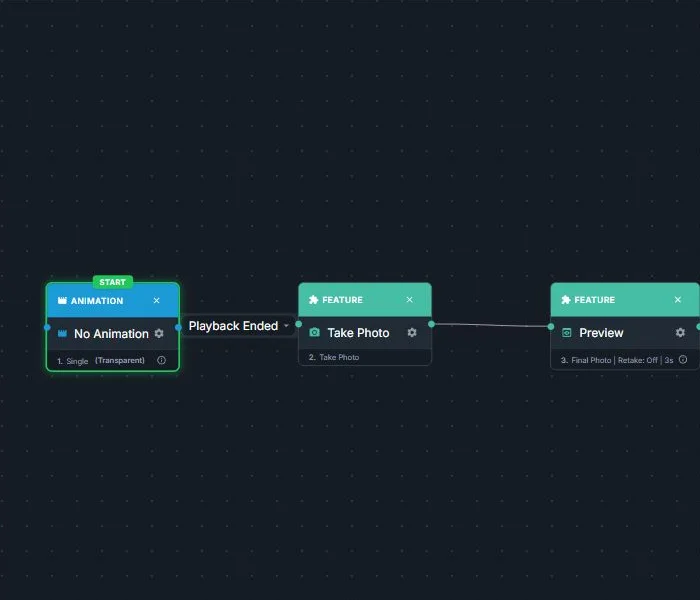
Workflow
A workflow is the complete experience the user goes through from beginning to end.
What It Represents
-
The entire path: from the initial screen to the final action.
-
All steps, transitions, and conditions that define the experience.
Examples
-
Standard Photo Booth: Welcome → Disclaimer → Capture → AI → Preview → Print → Email
-
Survey Flow: Welcome → Survey → Thank You → Email Receipt
In the Builder
-
Displayed as the full canvas containing steps and edges.
-
You can maintain multiple workflows for different events or use cases.
Step
A step is a single action, screen, or operation inside the workflow.
What It Represents
- One stage in the user journey: displaying content, capturing media, collecting data, applying AI, or sending outputs.
Typical Step Categories
Capture & Media
Take Photo, Record Video, Live View, Screen Capture, Screen Recording
AI & Effects
AI Headshot, AI Cartoon, AI Oldify, AI Modify, AI StylePop, AI Line2Life, AI Background Removal
User Interaction
Selection Screen, Games, Draw Me Offline, Survey
Information & Compliance
Disclaimer, Instruction Screens, Branding Screens
Output & Sharing
Print, Save Final Photo, Email, SMS, QR Code
In the Builder
-
Each step appears as a box (node) on the canvas.
-
Selecting a step opens its configuration panel (text, options, limits, styling).
-
Steps usually have one or more incoming and outgoing connections.
Edge (Connection)
An edge is a connection line that defines what happens after a step completes.
What It Represents
-
The transition from one step to the next.
-
The logic or condition that determines which path the flow follows.
Common Edge Types
Navigation Edge (NavEdge)
Standard “continue to the next step.”
Skip Edge / Skip on 0 Prints
Skip a step based on specific conditions (e.g., no prints requested).
Retake Edge
Return to a capture step for another attempt.
Disagree Edge
Alternative path when a user declines a disclaimer or similar prompt.
AI Error Edge
Fallback path if an AI request fails (timeout, cloud error, invalid data).
In the Builder
-
Displayed as lines or arrows connecting two steps.
-
Different edge types may appear with distinct colors or labels.
-
A step can have multiple outgoing edges (e.g., Continue vs Retake vs Error).
Trigger
A trigger is an event or condition that starts a workflow or redirects it.
What It Represents
-
When the workflow begins.
-
In advanced setups: when to jump to another part of the flow based on an event.
Examples
Workflow Start Triggers
-
The booth starts a new session.
-
A user taps “Start” on the welcome screen.
Branching Triggers
-
AI operation fails → follow the AI Error Edge.
-
A specific selection is made on a Selection Screen.
-
No prints requested → follow the Skip on 0 Prints Edge.
In the Builder
-
The start trigger appears as a start node or entry point.
-
Additional triggers are configured through step settings or specialized edges.
How These Concepts Work Together
-
Workflow = the full map
-
Steps = the locations on the map
-
Edges = the roads connecting those locations
-
Triggers = what starts the journey or moves you to a different route
Example Flow
Trigger
User starts a session → enter the workflow.
Step 1: Disclaimer
-
If the user agrees → Continue edge → Take Photo
-
If user declines → Disagree Edge → “Cannot continue” screen
Step 2: Take Photo
-
If the user wants a retake → Retake Edge → Take Photo
-
If user approves → Continue → AI Headshot
Step 3: AI Headshot
-
On success → Continue → Preview
-
On error → AI Error Edge → Fallback screen
The modern navigation contract
Treat the connections on the canvas as the authoritative route through the experience:
- A normal step follows its connected continuation only when that edge's trigger is satisfied.
- A branch such as a Selection Screen area, Preview Retake, Disclaimer decline, payment result, or zero-copy action follows the branch configured for that result.
- A child workflow returns to the parent workflow through the parent's configured continuation; build and test that return instead of relying on canvas position.
- Back navigation returns through the supported parent or paged-selection relationship. It does not invent a route to whichever node looks closest on the canvas.
- Legacy workflows can retain compatibility behavior, but newly edited workflows should use explicit connections for every path.
This matters most in workflows with Mixed Selection Screens, Payment areas, multiple AI batches, or reusable child workflows. Lay the canvas out for readability, but remember that visual placement does not define execution order; the edges and triggers do.
Validate a workflow before an event
- Follow every edge from the entry point and confirm that no branch ends unexpectedly.
- Test all selection areas, Back paths, Retake, skip, decline, payment, and error routes.
- If several AI services run together, confirm that one AI Processed wait covers the intended batch. Add another wait before a later dependent batch.
- Open every child workflow and confirm how it returns to the parent.
- Sync and run the complete experience on the event computer or iPad.
Was this helpful?
Related articles
FMX for Windows: Customizing Your Experience
Everything at a photo booth event (the overlays, the countdown, the on-screen text, the email guests receive, the gallery they get a link to) is something you control. This guide m
FMX for Windows: System Requirements
Before installing FMX on your Windows computer, make sure your system meets the requirements below. Meeting the recommended specifications will ensure smooth performance during eve
Installing FMX on Windows
When to Use First-time installation of FMX on a Windows PC Reinstalling FMX on the same machine Upgrading FMX to a newer version using the latest installer Requirements Windows 10
Login to FMX
When to Use Immediately after installing FMX When switching operators or moving the license to a different PC Requirements A Foto Master Cloud Account (email and password) At least
Building a FMX Preset From Scratch: Video Tutorial
This video covers the basics of building a workflow and layout in FMX: a good starting point before exploring the individual workflow step articles.