
Create AI Trading Cards (5×7 Media)
AI Trading Cards are a premium, personalized keepsake; guests pick a theme, FMX captures their photo, the AI renders a stylized portrait, and the DNP printer outputs a horizontal trading-card spread that auto-cuts down the middle and slots into a standard acrylic case with a magnetic shield.
This guide walks through the four-step setup: printer media, Windows driver, FMX device settings, and the Foto Master Cloud preset/layout.
What you'll need
- FMX for Windows installed and signed in to Foto Master Cloud
- A compatible DNP printer (DS-RX1HS / DS620 / DS820) with 5×7 media loaded, paper roll and matching ribbon
- Foto Master Cloud account with the AI Trading Cards preset visible in your library (or any custom preset built to the 5×3.5 ratio)
Step 1: Load 5×7 Media in the Printer
Swap the paper roll and ribbon for the 5×7 set. Both pieces of media must match: never combine a 5×7 ribbon with 4×6 paper or vice-versa, it will damage the print head.
- Power the printer off.
- Open the printer and remove the existing paper roll and ribbon.
- Install the 5×7 paper roll, threading it as marked inside the printer body.
- Install the matching 5×7 ribbon.
- Close the printer and power on. Wait for the ready light before continuing.
Step 2: Set Paper Size in the Windows Driver
The printer reports its capabilities to Windows; we tell the driver to use the cut-card paper size so each print becomes two trading cards.
- Press the Windows key → Settings.
- Open Bluetooth & devices → Devices.
- Scroll down and click More devices and printer settings.
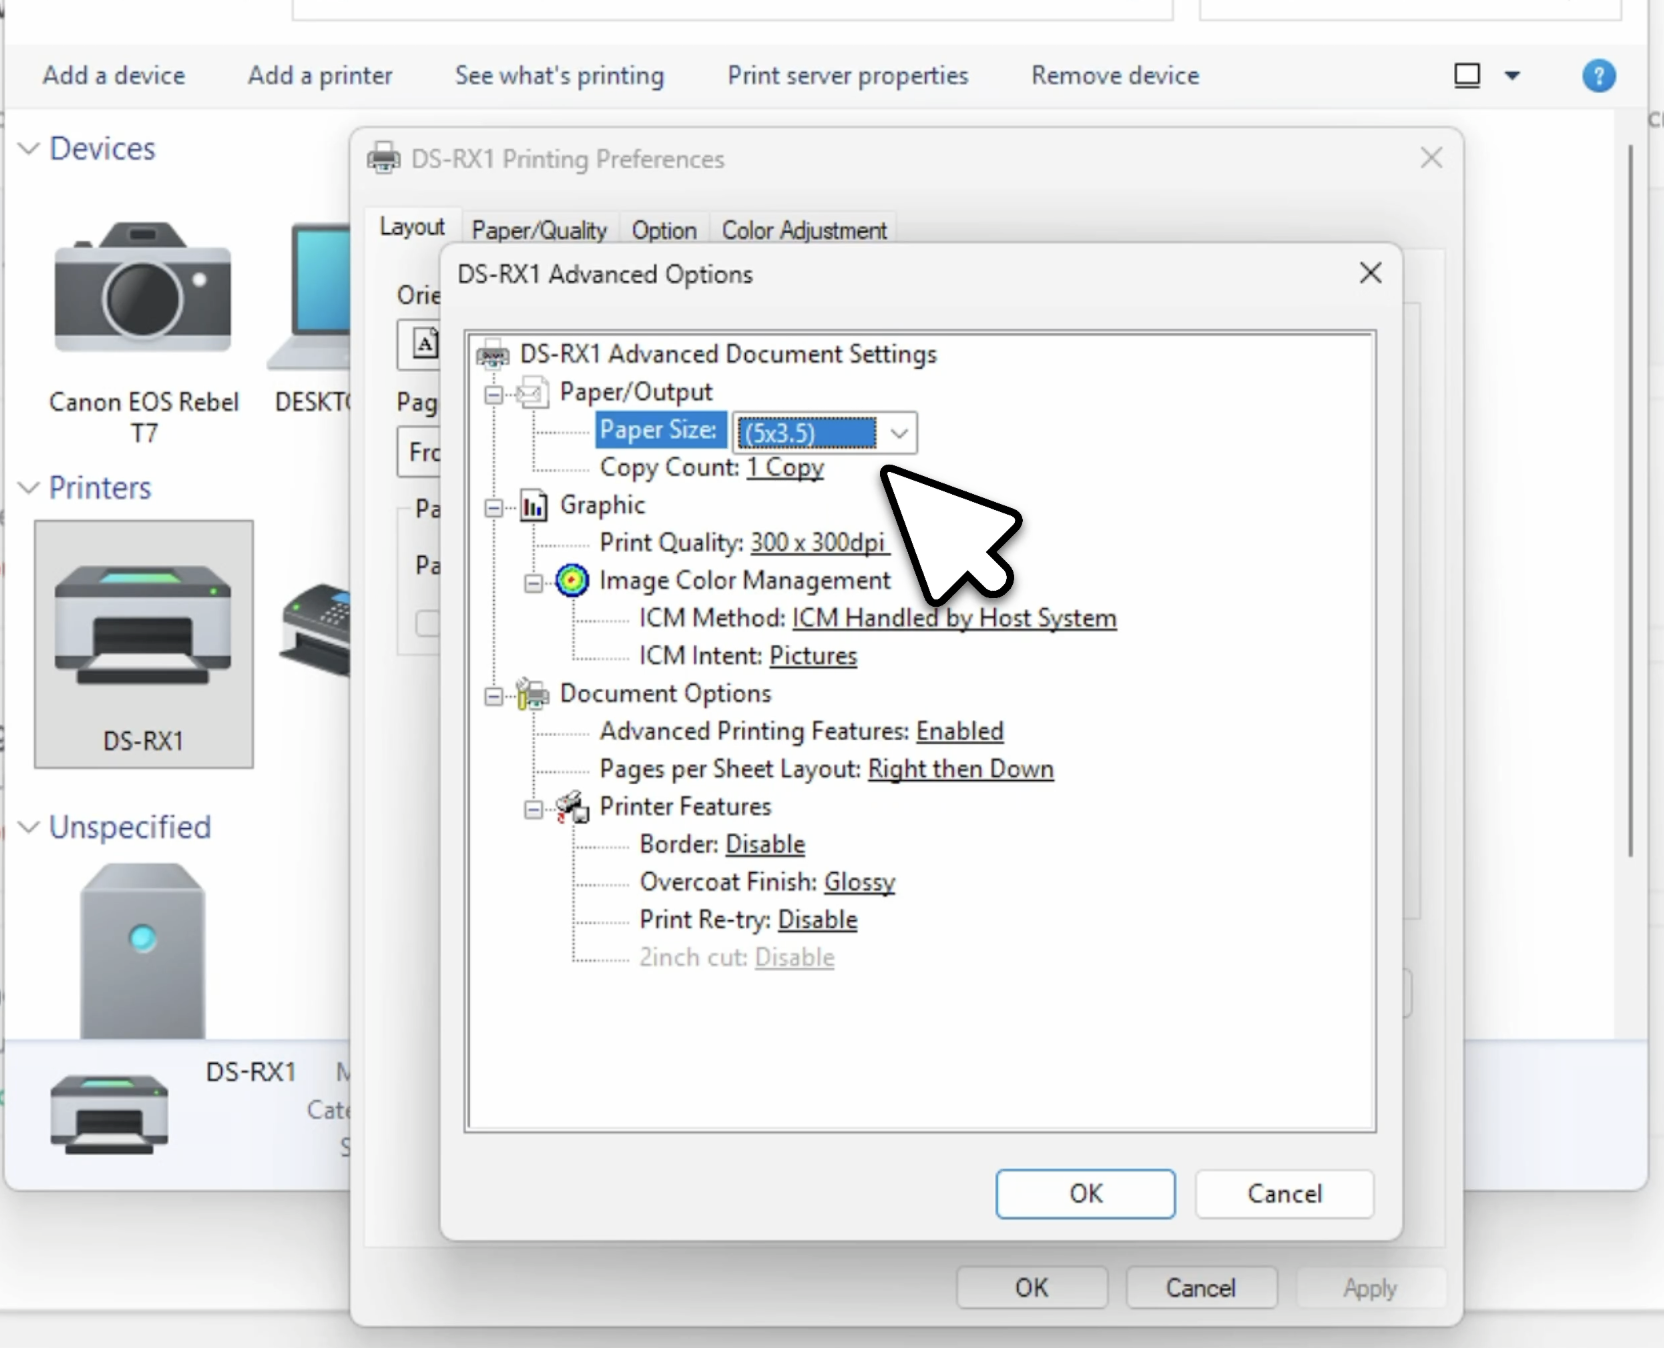
- Right-click the DNP printer (e.g., DS-RX1) and choose Printing preferences.
- On the Layout tab, click Advanced….
- Under Paper/Output → Paper Size, choose (5×3.5).
- Click OK twice to save.
Step 3: Confirm FMX Print Orientation
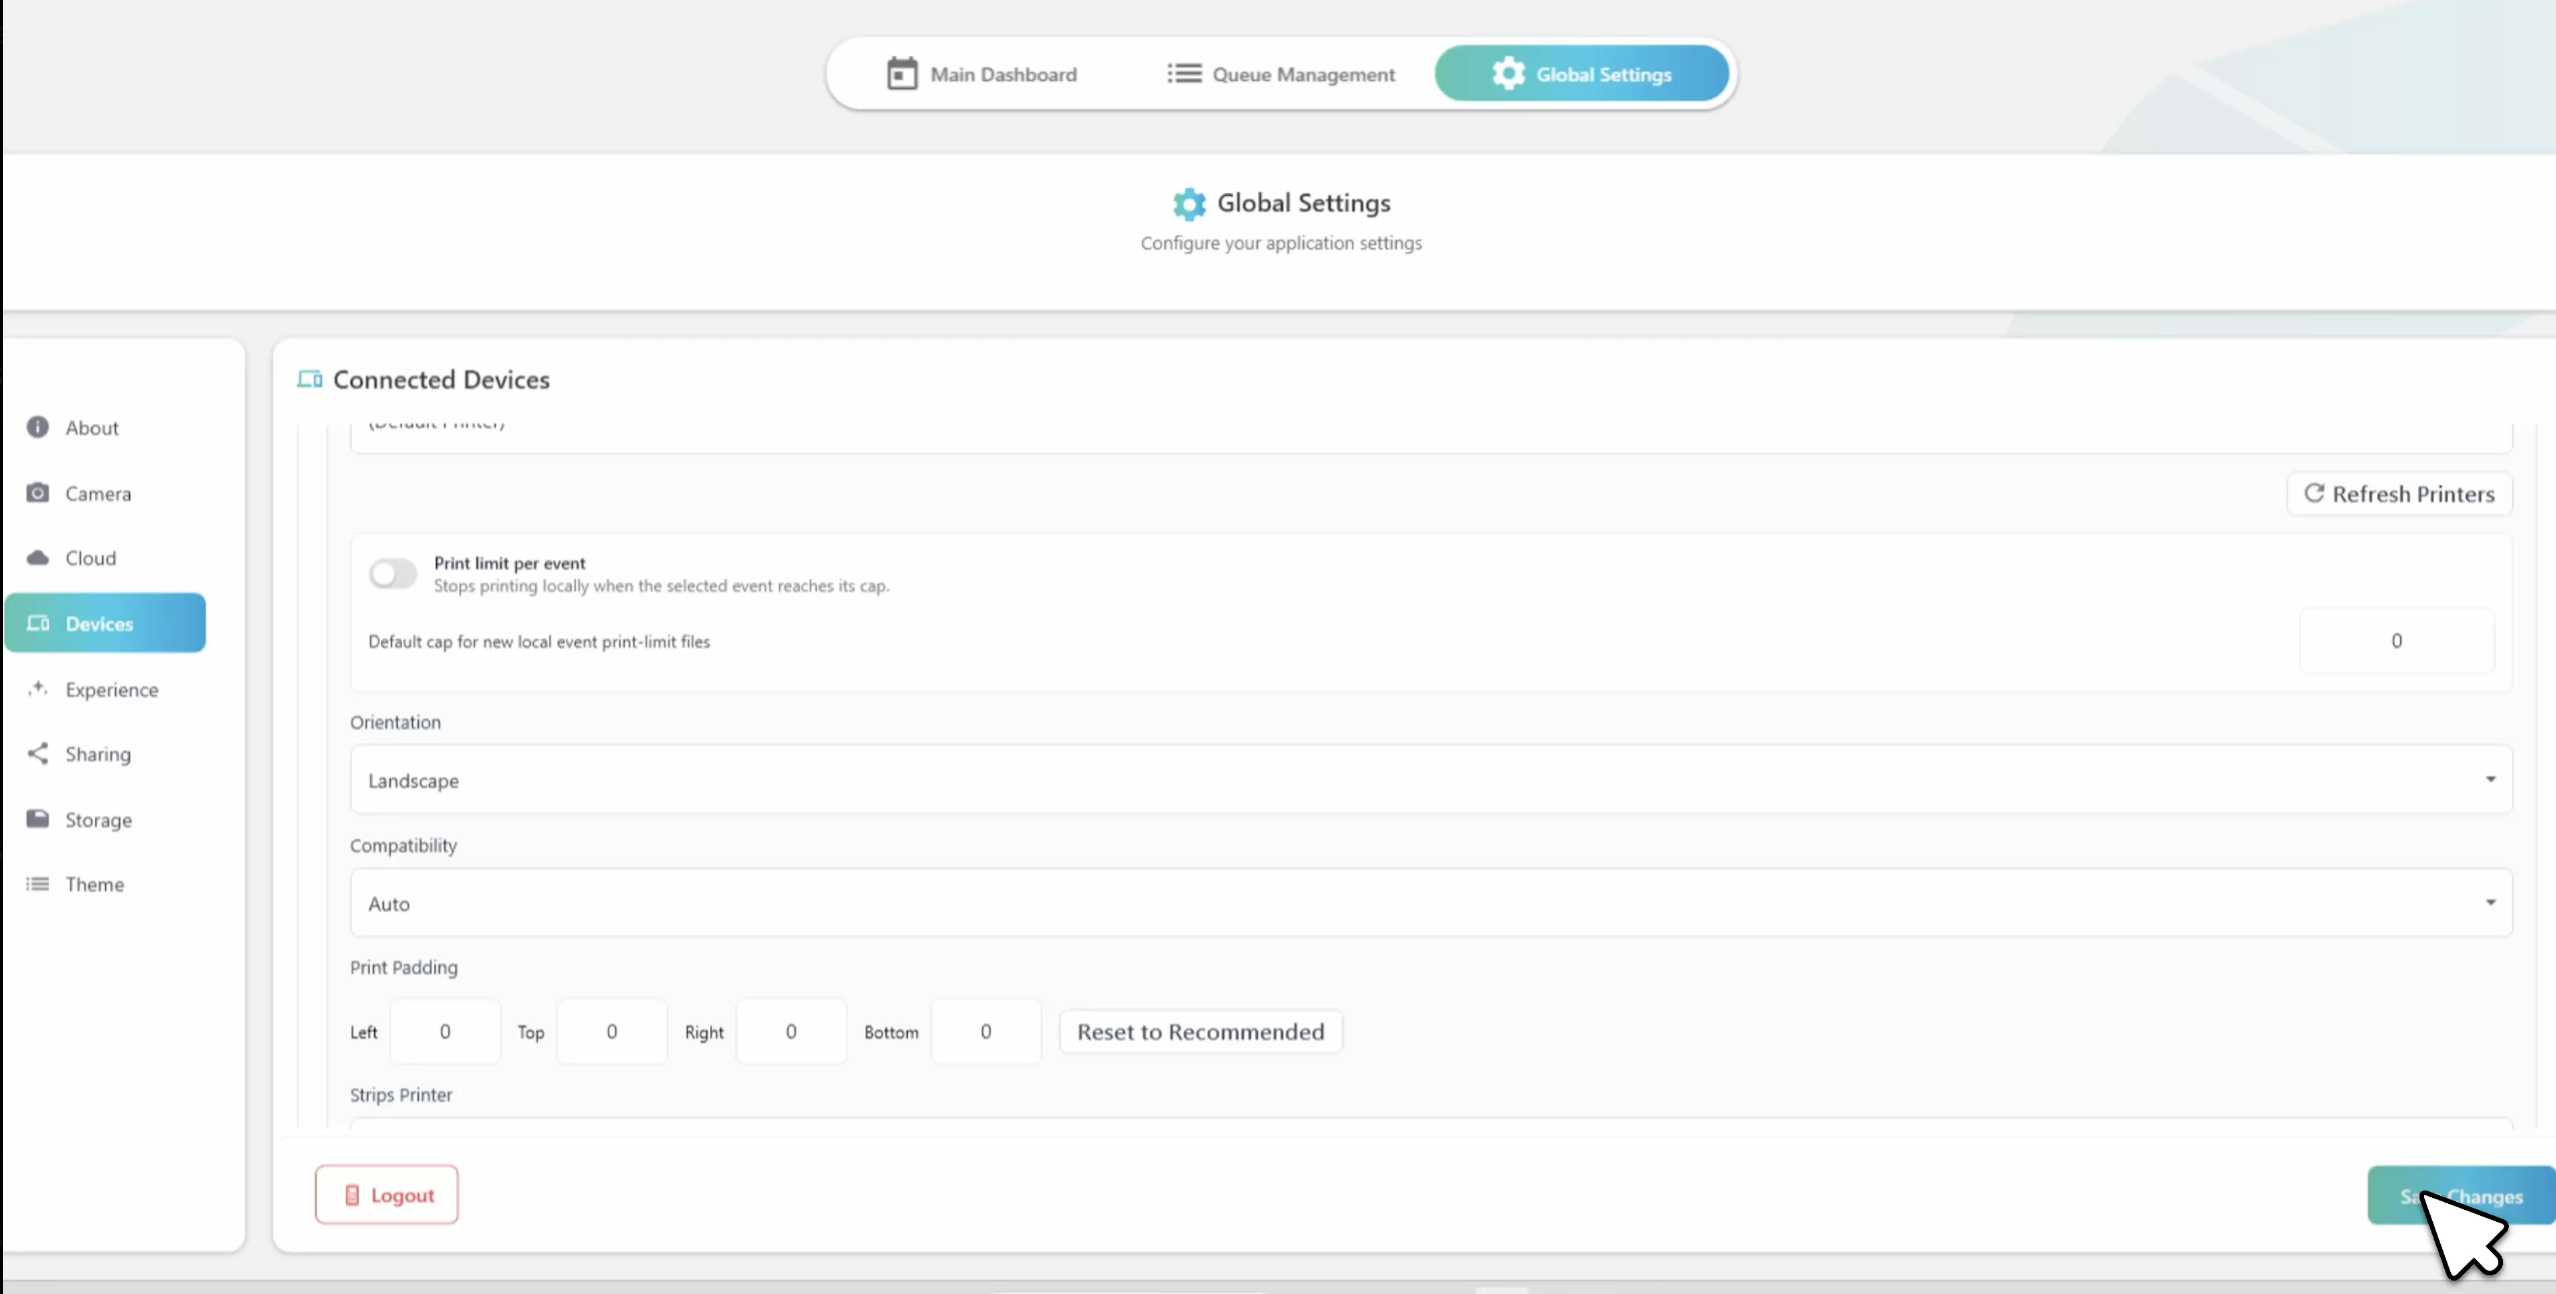
In FMX Global Settings → Devices → Printer, set Print orientation to Landscape.
Auto normally picks landscape on its own for cut-card output, but setting it explicitly avoids surprises on the first print of an event.
Click Save Changes in the bottom-right when done.
Step 4: Use the Trading Cards Preset (or Build Your Own)
Option A: Load the pre-made preset
Foto Master offers a ready-made World Cup AI Trading Cards preset that you can load straight from Select-Sync-Play. The only operator-side configuration is the printer and a single FMX setting: once those are in place, you can swap in any theme by tweaking the workflow's prompt.
This is the fastest path and the recommended starting point.
- In Foto Master Cloud, open your event and click Select-Sync-Play.
- Click Load Preset on the FMX (Windows) device row.
- Choose World Cup AI Trading Cards from the preset library.
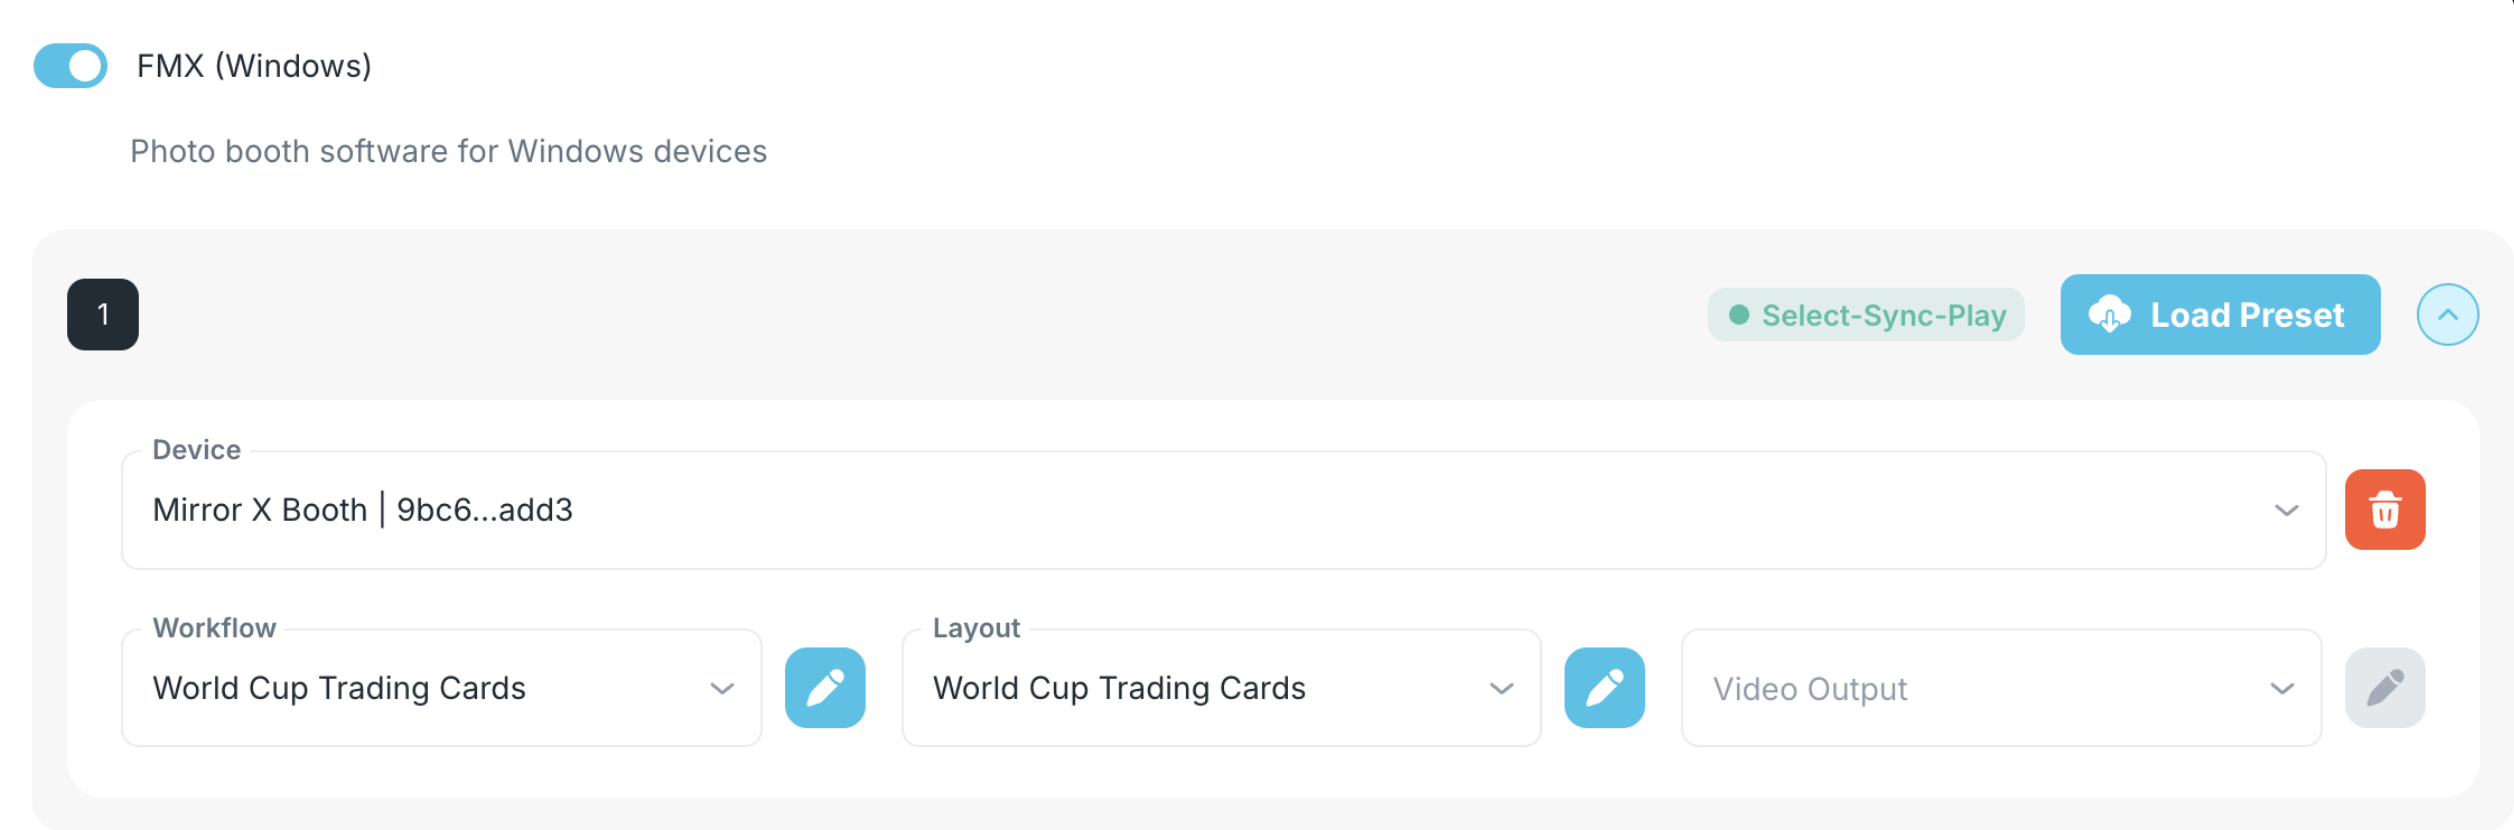
That's it; the preset bundles a 5×3.5 layout, a tuned AI workflow with the right output ratio, and a sample prompt. Sync the event to FMX, and you're ready to run.
Option B: Customize the workflow on an existing preset
After loading the preset, click the pencil icon next to Workflow.
It will create a duplicate copy of the Trading Cards workflow.
You can then edit the AI Modify prompt, replace the animations, or rewire steps.
💡 Tip: Don't forget to rename the new workflow and save it.
Option C. Start from scratch
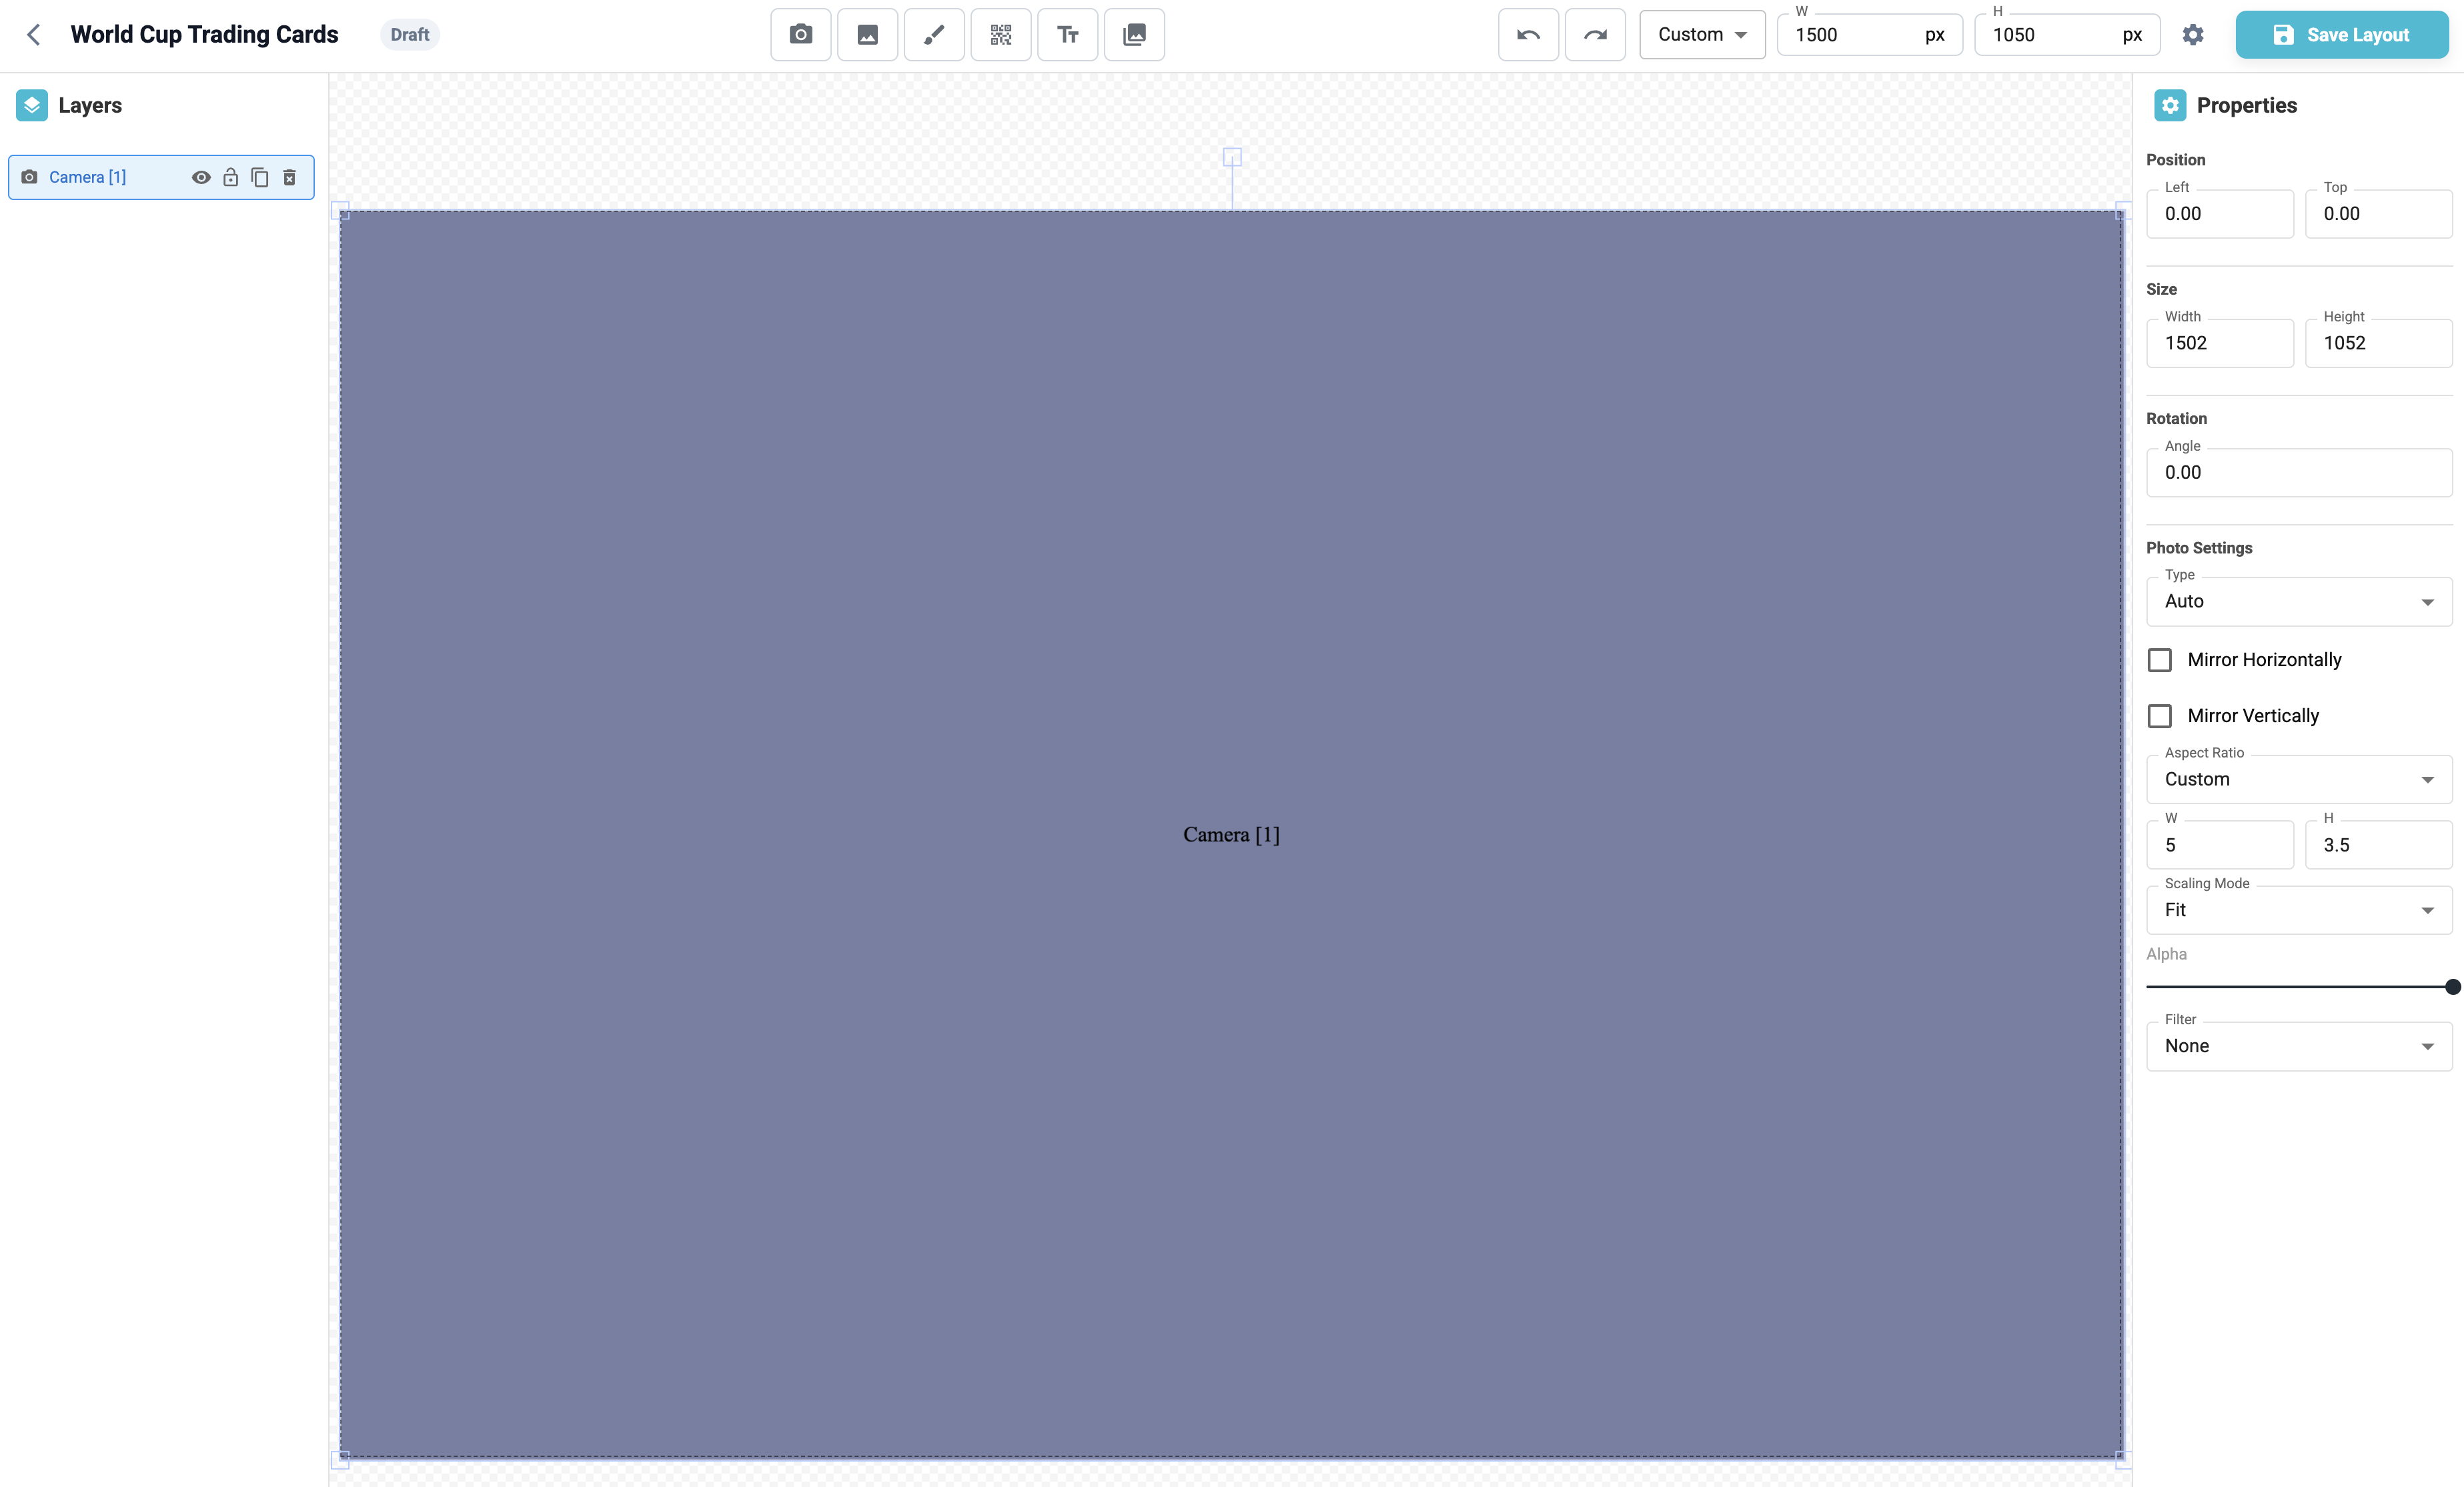
If you're building a brand-new template instead of reusing the preset, the layout must be 1500 × 1050 (5×3.5 at 300 DPI). Either build it manually or import this JSON in the Layout Builder to skip straight to the right canvas + camera element:
{
  "layout": {
    "width": 1500,
    "height": 1050,
    "ratio": "Custom"
  },
  "elements": [
    {
      "id": "camera-7",
      "type": "camera",
      "idx": 1,
      "props": {
        "left": 0,
        "top": 0,
        "width": 1500,
        "height": 1050,
        "angle": 0,
        "type": "Auto",
        "aspectRatio": "Custom",
        "customRatio": [5, 3.5],
        "fitMode": "fit",
        "alpha": 100,
        "filter": "None",
        "hairFilter": "Normal",
        "flipX": false,
        "flipY": false
      }
    }
  ]
}
This is what the layout looks like when correctly set up: a single camera element filling the canvas, locked to a 5×3.5 custom ratio:
Writing prompts for custom themes
The output ratio is the only constraint that matters when changing the AI prompt.
Whatever theme you're rendering (football, fantasy, retro arcade, corporate branding) anchor the prompt to a horizontal 5×3.5 inch trading-card spread that fills the canvas edge-to-edge. A solid opening line:
"Create a high-end trading card print layout in a horizontal 5×3.5 inch format. The design should completely fill the canvas edge-to-edge as a flat print-ready trading card spread…"
Follow that with the theme-specific styling (color palette, lighting, props, typography).
⚠️ Avoid prompts that ask for a vertical card or a portrait crop; those will print with white bars on either side.
Read Next
Was this helpful?
Related articles
FMX for Windows: Customizing Your Experience
Everything at a photo booth event (the overlays, the countdown, the on-screen text, the email guests receive, the gallery they get a link to) is something you control. This guide m
FMX for Windows: System Requirements
Before installing FMX on your Windows computer, make sure your system meets the requirements below. Meeting the recommended specifications will ensure smooth performance during eve
Installing FMX on Windows
When to Use First-time installation of FMX on a Windows PC Reinstalling FMX on the same machine Upgrading FMX to a newer version using the latest installer Requirements Windows 10
Login to FMX
When to Use Immediately after installing FMX When switching operators or moving the license to a different PC Requirements A Foto Master Cloud Account (email and password) At least
Building a FMX Preset From Scratch: Video Tutorial
This video covers the basics of building a workflow and layout in FMX: a good starting point before exploring the individual workflow step articles.