
PMWall Main Image Framing and Aspect Ratio
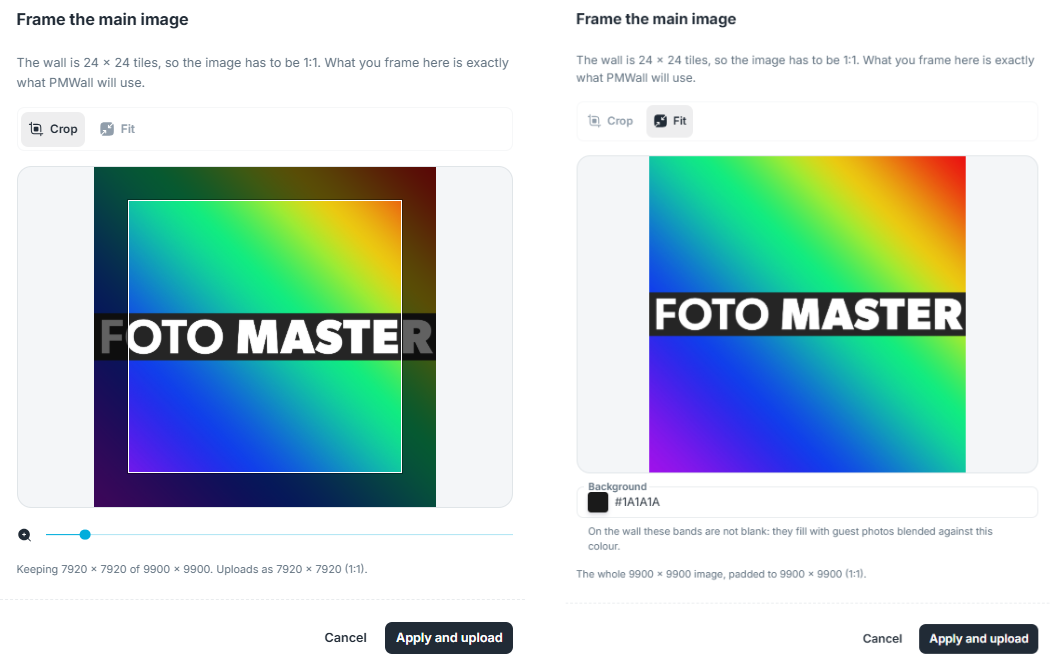
The main image is the picture your mosaic reveals. Because it has to be divided into a grid of square tiles, its shape is not a free choice -- it has to match the grid.
Getting this right in the Cloud template means what you approve on screen is exactly what appears on the wall.
Why the Aspect Ratio Is Fixed
Mosaic tiles are square. A wall of 50 columns by 40 rows is therefore 50 units wide and 40 units tall -- a 5:4 shape. The required aspect ratio is always simply Columns : Rows.
If the main image is a different shape, PMWall crops it to fit when the mosaic starts. It crops from the centre, so whatever sits near the edges is discarded.
The Framing Preview
In the Main Image & Grid tab, once a main image is uploaded, the editor shows the required aspect ratio and dims the region PMWall will discard. It also states which portion of the original will be kept.
If the image already matches the grid shape, the editor says so, and PMWall uses the file as-is with no cropping at all.
The preview is derived from the real image dimensions against the current grid, so it always reflects what PMWall will actually do.
Adjust Framing
Rather than accepting a centre crop, click Adjust framing and choose the framing yourself. Two modes:
- Crop -- Drag and zoom to choose which part of the image survives. Use this when the subject is off-centre, or when the automatic crop would cut a logo or a face.
- Fit -- Letterbox the whole image over a background colour of your choice. Use this when nothing can be lost -- a full logo lockup, or artwork with text.
Either way, the editor exports the
framed result at exactly the right shape for your grid, so PMWall performs no further cropping.
Tip: Reach for Fit whenever the image contains text or a complete logo. Cropping a wordmark is the most common way a mosaic disappoints a client.
Choosing an Image That Works
Framing is only half the problem. A mosaic reproduces the image at grid resolution -- a 50x50 grid has just 2,500 "pixels" of information.
- Favour strong shapes, high contrast, and a clear subject.
- Fine detail, thin lines, and small text will not survive.
- Faces work well, but keep them large in the frame.
- The larger the grid, the more detail survives.
Squint at the image, or shrink it to the size of your grid on screen. If it is still recognisable at that size, it will work as a mosaic.
If You Change the Grid
Changing Columns or Rows after uploading changes the required aspect ratio, so the stored image no longer matches. The preview updates and shows the new crop that would be applied, and offers Adjust framing so you can re-frame.
Re-frame after any grid change. The preview stays honest, but a crop chosen for the old shape is rarely the right crop for the new one.
If re-framing an already-stored image fails, the editor will ask you to upload the image again. That is a storage permissions limitation, not a problem with your image.
Lock It Before the Event
The grid and the main image are locked once the wall has tiles on it. Changing either afterwards invalidates every placed tile, and PMWall will warn you that accepting the change clears the wall on the next start.
Settle the grid, then the framing, then run a test. In that order.
Read Next
- Configuring PMWall Templates in Foto Master Cloud
- Photo Mosaic Wall: Setup Checklist
- PMWall Settings Guide
Was this helpful?
Related articles
Configuring PMWall Templates in Foto Master Cloud
A PMWall template holds everything about a mosaic activation: the main image, the grid, and every behaviour setting PMWall uses during the event. Because the template lives in Foto
PMWall Settings Guide
PMWall settings live in two places, and which one you need depends on whether the setting describes the event or the device. Event settings are authored in the Foto Master Cloud te
Photo Mosaic Wall: Setup Checklist
Work through this checklist before every Photo Mosaic Wall activation. The wall is run by PMWall, and its settings come from a PMWall template in Foto Master Cloud. Planning Before